
To use this structure correctly, you need the right technology and a quick and easy way to prepare the lesson. A discovery lesson should only replace a typical lecture when it is just as effective, does not waste extra time, and is just as smoothly implemented.
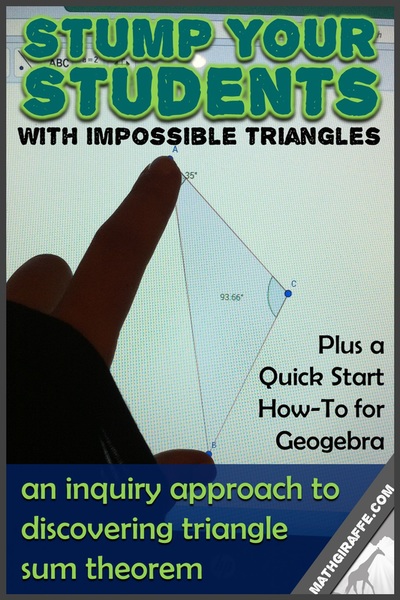
My favorite tool for teaching with technology is GeoGebra. With the GeoGebra software, you can set up a lesson for your students in only a minute or two, and they can see relationships in figures that are impossible to view and manipulate in a typical math lesson or lecture. This software is free for teachers and students to use. I have put together a quick-start guide with a few sample lesson ideas. This will show you specifically how you can use the software to set up a smooth discovery lesson for your Geometry students. Basics
Getting into the Software & Setting Up:
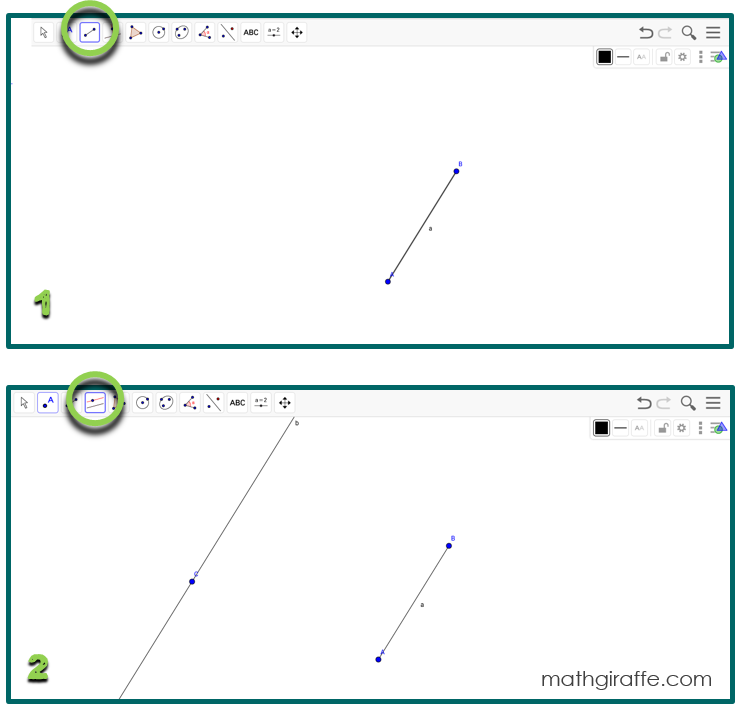
1. Go to Geogebra.org and click “Start GeoGebra” (There are also materials and lesson guides available to browse.) 2. Set up a “Geometry” working screen. 3. In the menu (three horizontal bars in the top right corner), select “options.” In options, select “labeling.” choose to “display all new objects.” This helps your students to save time and communicate in pairs more easily by saying “Move point A”, etc. 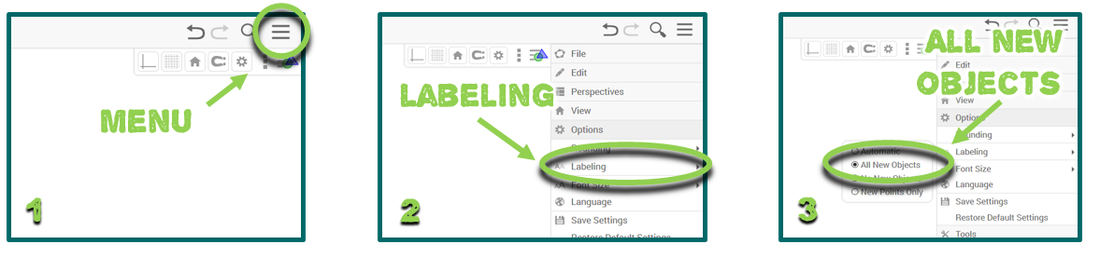
Play around the first time you get in. Practice making a triangle by selecting a “polygon” from the top menu. Click three times to make the three points, then click again on the first point to close/finish the figure. Then select the arrow from the top menu to drag a vertex and manipulate your triangle. Try displaying an angle measure by selecting the angle tool in the top menu, and then clicking on the two lines/rays that form the angle. Try displaying a side length as well.
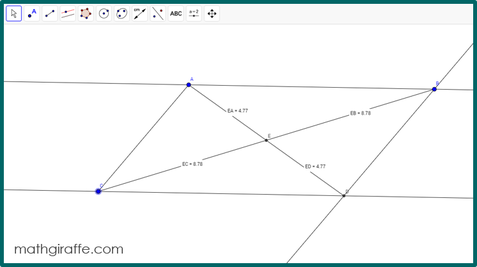
These are the basic tips you will want to show your students. Before your first investigation lesson, work together at the front of the room (if possible) on a smart board or using a projector. Allow students to practice manipulating a figure, creating new diagrams, and displaying measures. Sample: Diagonals in a Parallelogram
Depending on the level of your students, you can do the “Prep” part ahead of time as the teacher, or you can have students follow these directions and start from scratch.

Lesson:
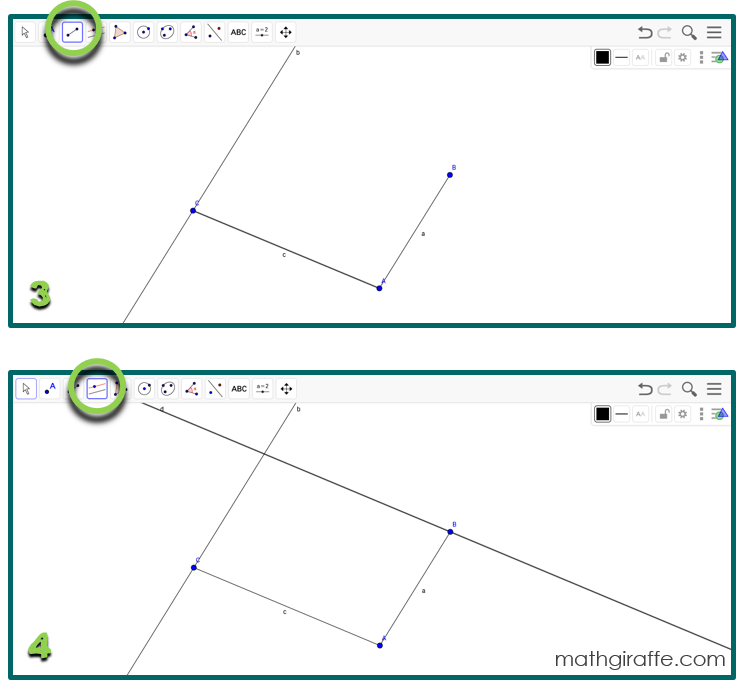
1. Give students (in pairs) the prepared screen with a parallelogram (or directions to construct their own) and ask the following essential question: “What properties do diagonals of a parallelogram always have?” (Explain a “diagonal” if necessary.) 2. Allow students to work in pairs to add the diagonals, manipulate the diagram, and make observations. Encourage them to display angle and side measures to try to determine relationships. Have them discuss what happens as they drag a vertex. Which measurements change? Which stay the same? 3. Try to avoid giving too many hints. This learning process is great for their brains! 4. Require students to formally write up their observations. 5. Encourage students to extend the properties to other quadrilaterals. Next, have them construct a rectangle and its diagonals and observe what properties are maintained as vertices are dragged. What about a trapezoid? 6. If your students would benefit from reflection or additional structure, try using the half sheet that works for any hands-on digital discovery lesson in Geometry. Sample: Angle Inscribed in a Semicircle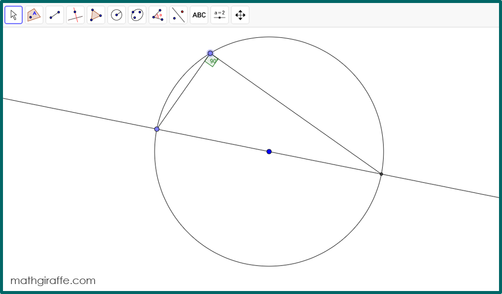
Depending on the level of your students, you can do the “Prep” part ahead of time as the teacher, or you can have students follow these directions and start from scratch.
Lesson:
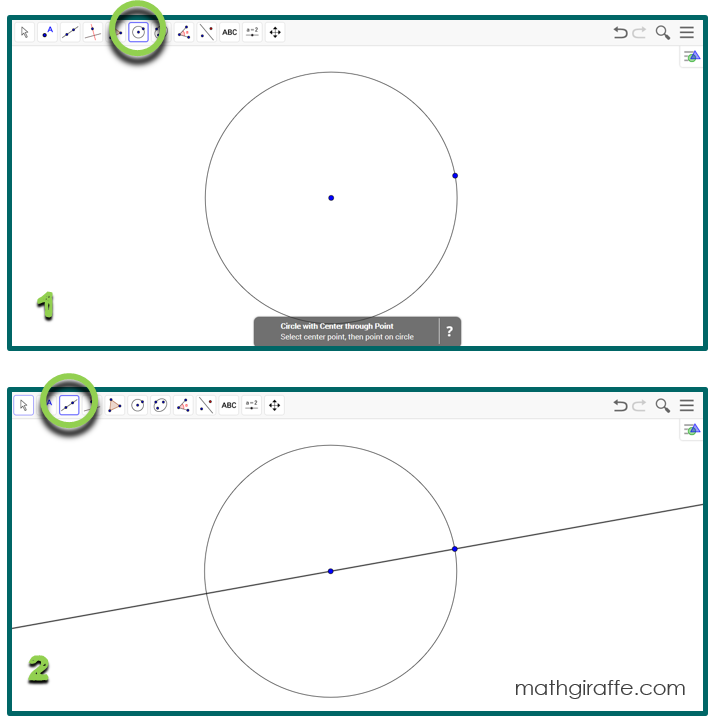
1. Give students (in pairs) the prepared screen with a circle and an angle inscribed on the diameter (or directions to construct their own) and ask the following essential question: “What properties do angles inscribed in a semicircle always have?” 2. Allow students to work in pairs to manipulate the diagram, test cases, and make observations. Encourage them to display angle measures and lengths to try to determine relationships. Have them discuss what happens as they drag the point on the circumference and when they make the circle larger or smaller. Which measurements change? Which stay the same? 3. Try to avoid giving too many hints. This learning process is great for their brains! 4. Require students to formally write up their observations. 5. Encourage students to extend the properties to other inscribed angles. Next, have them construct different angles in the circle that do not subtend the diameter. What about angles that are not inscribed? 6. If your students would benefit from reflection or additional structure, try using the half sheet that works for any hands-on digital discovery lesson in Geometry. Resources, Links, & Tips
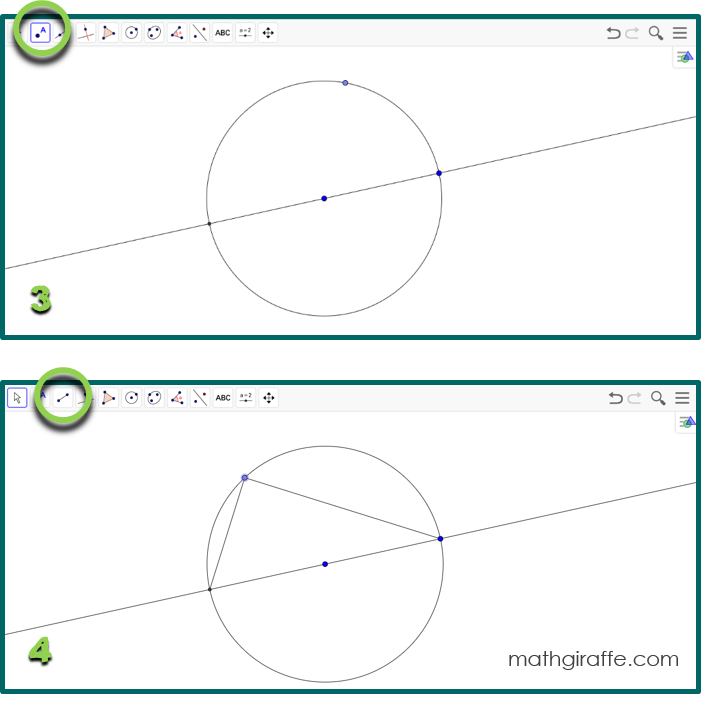
• Use digital discoveries only when a physical hands-on idea will not cut it. It’s important for kids to physically touch and move items whenever possible. This just cannot always be achieved in a tangible format without technology. Try physical activities too, like this hands-on lesson for discovering Triangle Inequality Theorem with markers with snap-on caps.
• Allow students to spend a little time exploring with the technology at the beginning, or during the first lesson that you introduce this type of activity. The more comfortable they are, the more options they will have for adding to their diagrams, changing things, manipulating what is there, and exploring new ideas and properties. Your students will likely catch on to the software faster than you can, so rather than trying to spend a long time teaching them the toolbar, just let them have at it! • Take time to set up your expectations and formal structure for any period that they are working this way. Decide how you want groupings to work (pairs or teams of three are great for this) and try to keep consistent partners throughout at least a quarter. Determine how much structure you will give, and whether you will kick off each property/lesson with a question, or only a figure. Explicitly teach students what you want them to turn in at the end. Do you want only the properties they discovered or a full reflection as they work? It may be nice to have them submit a diagram or two representing what was on their screen. They can always use extra practice drawing and labeling diagrams, so this approach can serve as both purposes. • Take a look at some of the built-in lessons in GeoGebra, as well as these in SketchUp. The SketchUp software is another option that allows you to do easy tessellations, let your students explore pyramids, prisms, and more. It’s great with 3d representations. There are a set of handy videos to get you started. 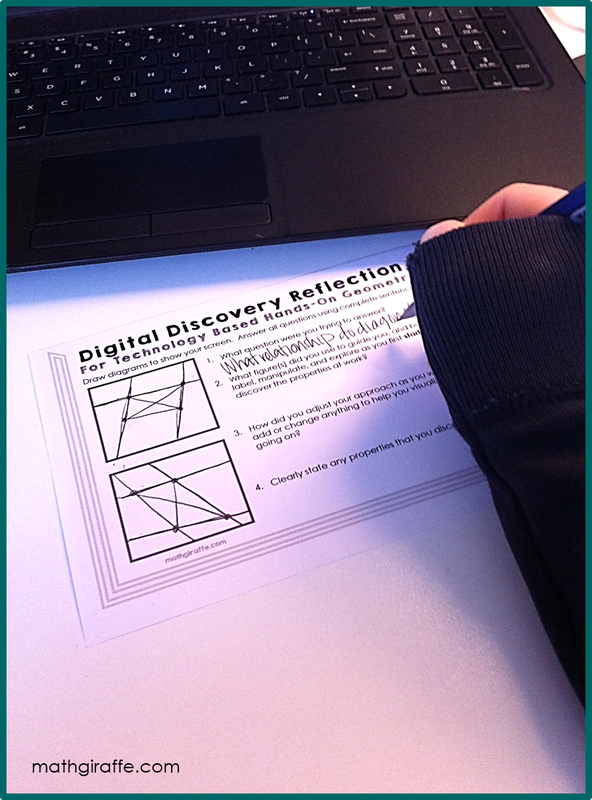
The student recording sheet works for any digital discovery lesson! (free download below)
Click here to download a printable PDF version of this article including all the steps. It also contains a half-page recording sheet for your students to use to accompany any digital discovery lesson.
Join up in the Math Giraffe email list for more! To Read Next:

15 Comments
2/2/2016 1 Comment Segment Addition Postulate
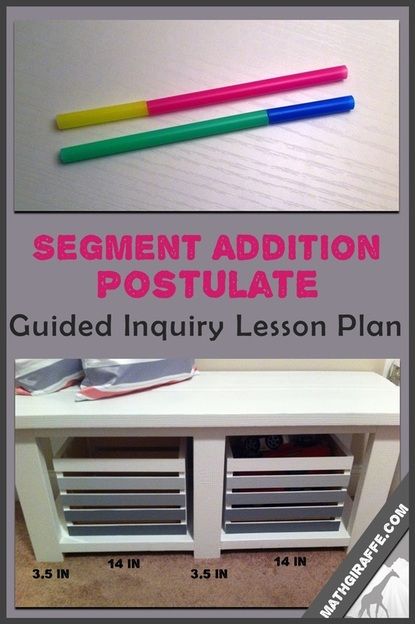
I prepped this by cutting a bunch of straws all in the same place. That way, I could just swap out colored sets so that each table had this:
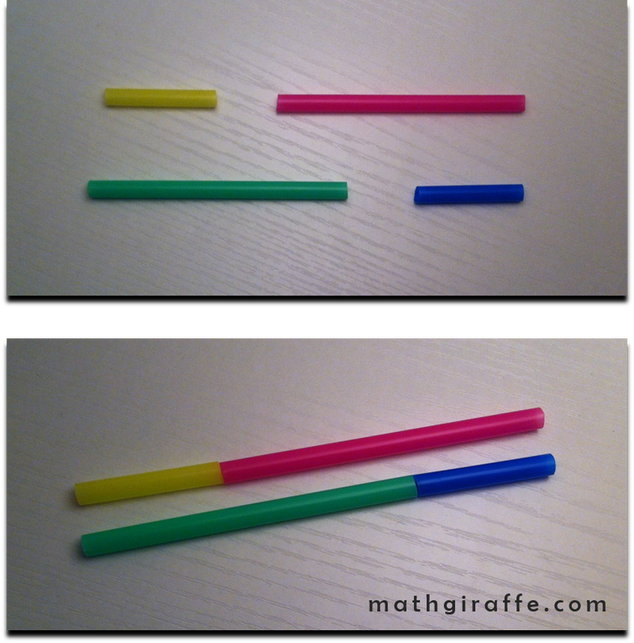
For something this quick, I like to keep it as a full-class guided inquiry. Just say "Without measuring, I can tell you you may assume that both of these new "straws" are the same length. Now what if I told you that the yellow and blue pieces are also the same length? What could you conclude about the green and pink pieces. Why?"
Give some time. Allow them to discuss with a partner. Yes, it's obvious, but require each pair to come up with a very clear explanation of WHY. Then, have them write it out (just in a notebook or on scrap paper for something like this). It only takes a minute, and does not require a formal worksheet. When students think they have a great explanation, allow them to share it out loud with the class. This is a great opportunity to zero in on properties and vocabulary. I'm a big stickler on this. It is so crucial that students do not write that the pink piece is "equal to" the green one. I also do not allow explanations that say "the yellow piece plus the pink piece." Students must say that "the length of the yellow piece plus the length of the pink..." I always feel like I cannot possibly over-reinforce the fact that measurements can be equal, whereas segments are congruent. Otherwise, when we lead into proof writing, I see angles being added instead of angle MEASURES being added. I like to show this slide to clarify that over and over! (Check out proof writing in more detail here.) 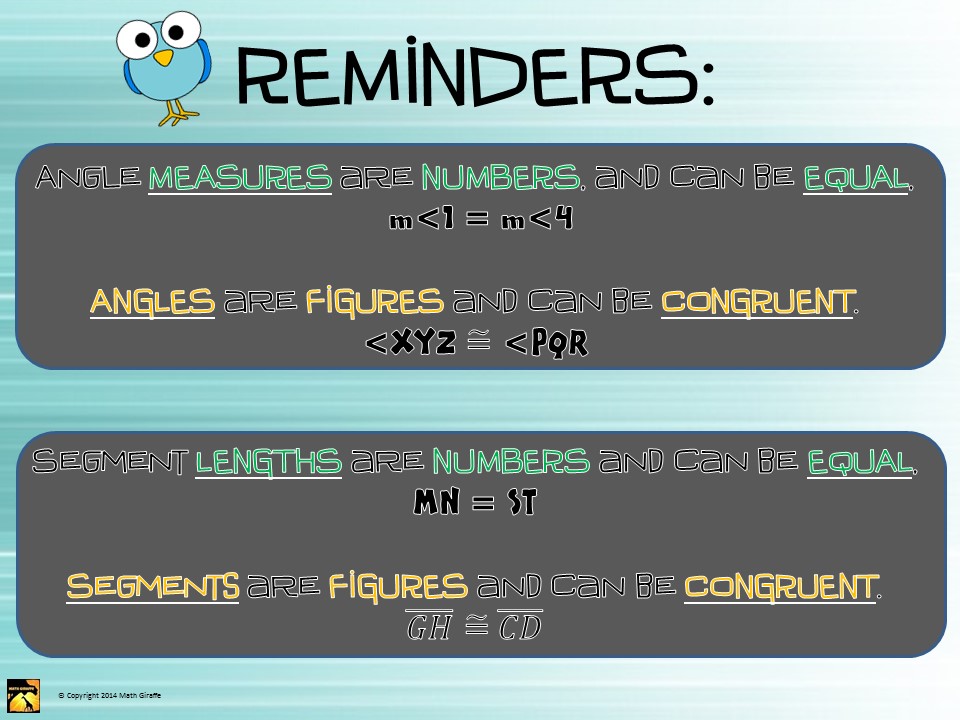
Once they really tweak and perfect the explanations, develop an official postulate together and clarify that now they can use this new "Segment Addition Postulate" to justify steps.
The key to the guided inquiry process is that the students have noticed the properties that are at play here, and they explore it enough to write their own postulate. It's hard to hold back, but don't be tempted to feed the postulate to them. They'll get there eventually as you slowly help them revise their "explanations." Next phase: Tell a story! I like to tell the students stories about real-life projects, so for this one I chose to use a bench that my husband and I just built. Feel free to steal my story (I stretched the facts to make the math situation work anyway, but I willingly admit it). And project or display my bench pictures as your sample if you want! "We were assembling this lovely bench at my parents' house, 3 hours away, because that's where all the good tools were. So it was sitting there on the garage floor covered in wet paint until our next road trip to go pick it up. I wanted to put it in my daughter's room when we brought it back home. I was getting all the furniture moved around in her room, and making space for it. I was wondering if I could fit it under the window, when suddenly I realized I had forgotten to measure it! We did not follow any particular plan to know the exact dimensions! However, I had taken a photo of our hard work, and I knew that we had used 2x4s for the legs. (Explain that 2x4s are actually only 3.5 inches wide.) I remembered cutting the bottom front faces to 14 inches each. Can I figure out how long the whole bench is?" 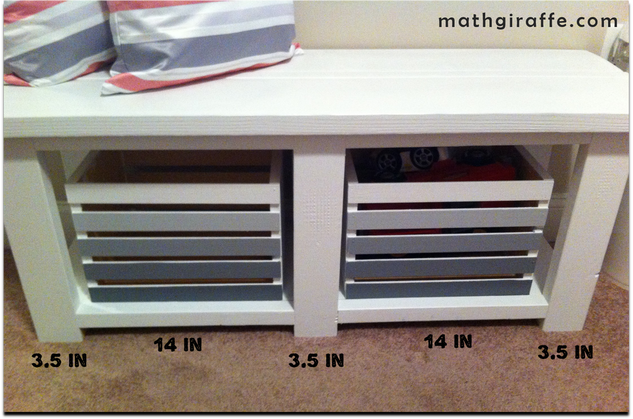
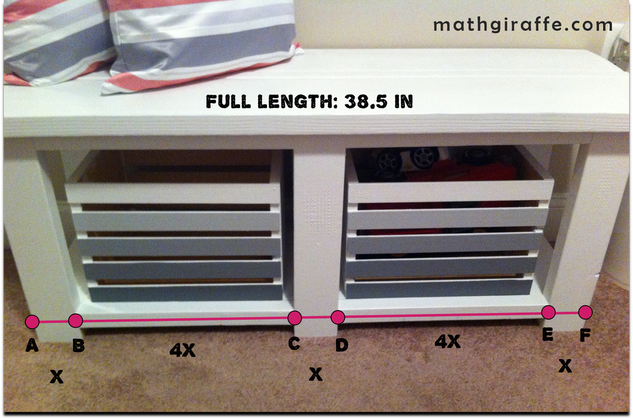
Of course, they will be able to handle this math. They could have answered the problem in 4th grade. Make sure to then lead into variables and replace each 3.5 with an x, and each 14 with a y. Then show the next picture, and ask them to write an equation that's more complicated. Try taking out different missing pieces of information. Ask them if they knew the full length, how could they find one piece? This will lead into sample problems. Have students set up an equation for only AD, then for AE, etc.
Wrap it up by going back to the straws. Now, give them measurements for each segment (as expressions with variables!) and ask them to write an expression representing the length of all 4 of the pieces lined up as one long segment.
Check out these related posts: 

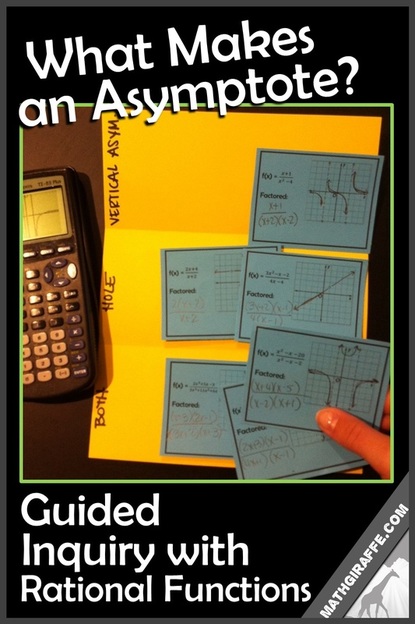
This is best BEFORE teaching how to find asymptotes and graph rational functions.
Start with just a 5 minute introduction to what an asymptote means and what it looks like. Then, the kids jump into Investigation 1. 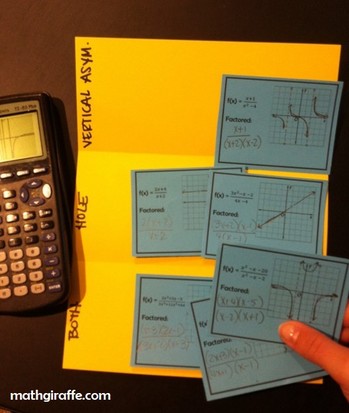
The kids analyze the factored forms of the functions and figure out what is causing the vertical asymptotes and holes.
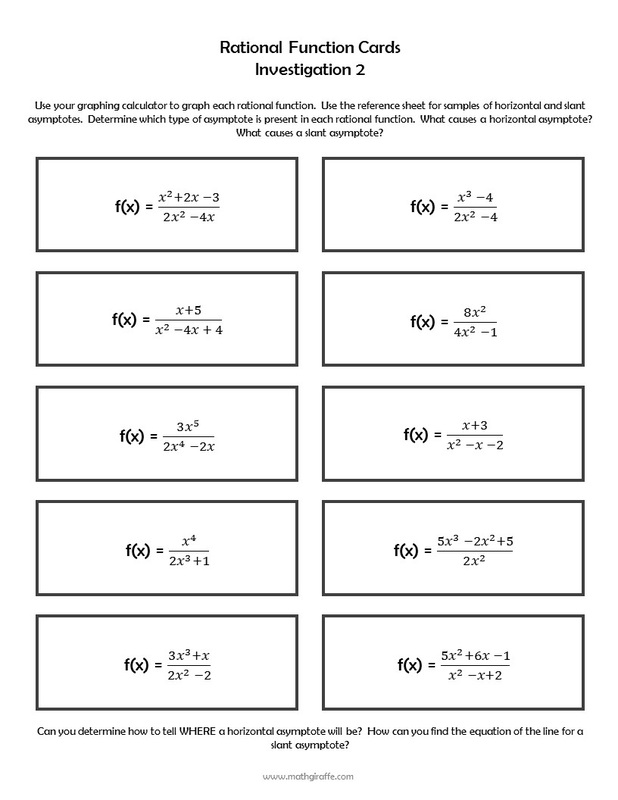
Then, the second investigation follows with horizontal and slant asymptotes. 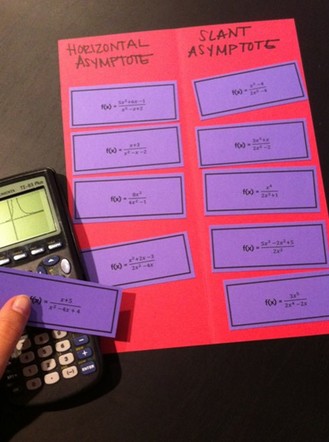
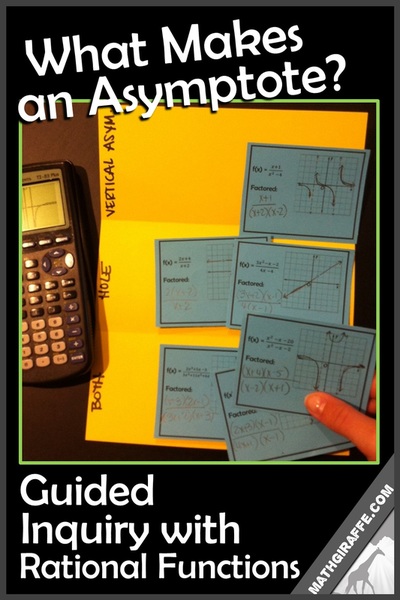
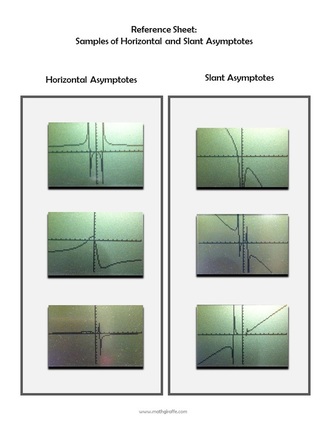
For this one, I made a little reference "cheat sheet" for the students. If they do not recognize what is happening on the calculator screen, they can take a peek at these samples.
For both parts of this activity, it works best if you have the students cut the cards apart. This way, they can separate and differentiate them. Then, they can look at each "collection" and start to hunt for the patterns and characteristics of each feature.
I like to have the kids work in pairs.

Click here to download all the files for the "What Makes an Asymptote" Investigation lesson.
Looking for more great high school math resources? Enter your email to get some sent straight to your inbox!
You may also like...


|
Archives
December 2023
Click to set custom HTML
|


 RSS Feed