
…Until the infamous 2020, or earlier, depending on the school. Technology is no longer a limited element of our students’ lives. For many teens, it is where their brain power, emotional energy, entertainment, school curriculum, and social lives are spent. A Day in the Life of a Screen-Addicted Teenager Consider for a moment what a typical day might look like for a high schooler in 2024. There is, of course, a spectrum of tech-dependency that varies based on family priorities and school structure. But as you know, many teenagers are engaged on screens within every. single. aspect. of their academic and personal lives. It’s worth imagining it, because their high school experience is likely different from yours. Let’s spend a moment imagining this reality. And feel free to wince, cringe, or give an audible “yikes” along the way. Upon hearing the alarm clock, there is a back-and-forth battle with the snooze alarm after a late night Netflix binge. A few incoming push notifications from Snapchat and Tiktok pique your interest. After scrolling through Instagram and catching up on the group messages sent after you fell asleep, you lethargically rise from bed. The getting ready and breakfast process is accompanied by Spotify music emanating from your nearby phone. The drive to school, whether with a parent, friend, or oneself, often includes more of the same stimulus input. Arrival in your first period class begins with a few face to face check-ins from friends. While waiting for your teacher to begin, you set up your laptop and ensure your school platform, Youtube, and Netflix tabs are ready for the day. Your phone is accessible for frequent checks at the top of your backpack. You quickly remember that today is a group collaboration day in Geometry. The project will be done on Google Slides. Perfect opportunity to keep open your personal tabs. Today’s exit slip will be typed on Canvas, so switching between that and your notes won’t be a problem. Fortunately, you have a few extra minutes to check last night’s ESPN scores. Your 2nd, 3rd, and 4th period require an open laptop. Your 6th period will use a QR codes for the day’s activity. Frequent push notifications, social media checks, and open Netflix tabs interrupt a state of workflow. Your afternoon classes include the use of one notebook, a pen, two collaborative apps, and one interactive video with corresponding typed questions. You and your mom correspond via text throughout your last class to settle what time you plan to leave school today. By 3:20, you are ready to walk home. Airpods and Spotify guide your way. The evening involves four homework assignments, only one of which involves pen and paper. The family tv, your sister’s Tiktok videos, and your soccer team’s exploding group message extend the homework “work time” well past dinner. Before crashing for the night, you fit in Facetime with your best friend and two hours of Instagram scrolling. Repeat. Repeat. Repeat.  One brick builds upon another Think of all the ways a child, adolescent, and teenager needs to develop throughout his/her lifetime. Take language development as an easy example. Singing, reading, and talking with children build the foundational “bricks” for effective phonics instruction. Sound phonics skills lead to decoding. Strong decoding leads to fluent readers. Strong readers can engage more fully when taught higher level skills. Higher level thinkers can express their ideas in writing, speech, etc. Pretty amazing to think of the progression in just this ONE area, isn’t it? Meaningful, varied learning experiences are what enable this essential progression to be successful. If learning is primarily rooted in one experience (screens), what is being lost? Dr. Michael Rich, author of The Mediatrician’s Guide: A Joyful Approach to Raising Healthy, Smart, Kind Kids in a Screen-Saturated World, writes “Much of what happens on screen provides “impoverished” stimulation of the developing brain compared to reality.” Children need a diverse menu of online and offline experiences, including the chance to let their minds wander” [1]. As a parent, teacher, or ANYONE who works with children and adolescents, we have the opportunity to create this variety! Have you noticed this trend? In your classroom alone, think about how many digital assignments take place in a week. Now multiply that times six or seven classes. If you struggle to remember what you ate for breakfast…as an adult with a fully-formed brain (even if coffee is required to activate it), think about today’s demands on a 16-year-old. In a recent conversation with current high school seniors, one trend stood out: not remembering submitted assignments. In the words of one student, “In middle school, we turned in our work physically. It registered that we turned it in. Now, it doesn’t even register. I started missing more assignments.” Does this excuse chronic late work? No. Are there ways to check for submitted assignments on most platforms? Of course. But the reality that students, yours included, are likely struggling with this issue is enough of a reason to periodically do something different, isn’t it?  Studies (…That likely support what you already witness!) Ok, now let’s connect research to these images, shall we? In a study conducted by the Inter-university Consortium for Political and Social Research, the average time 8th and 10th graders spend on social media is 3.5 hours daily. 1 in every 4 uses it 5+ hours per day, and 1 in every 7 uses social media for 7+ hours each day [2]. This is JUST social media! Throw in a full day of classroom instruction, 2-3 hours of homework, video game sessions, and even just one Netflix episode, and it’s hard to imagine any minutes remaining in a day.  Not Sold? Here are some more findings:
 Research across countries, demographics, age, sex, race, and socioeconomic status makes clear one truth: High amounts of screen time, repeatedly throughout one’s childhood and adolescence, lead to negative outcomes. Negative outcomes cause ripple effects.  Recognizing the Good Technology has led to a profound increase in efficiency, the ability to quickly cross-check information, an explosion of personalized learning platforms, quicker grading systems, ... the list goes on. There are obvious benefits to technology in one’s personal life as well. However, in most classrooms, there are not just elements of technology. It completely dominates. Notes. Exit slips. Group work. Annotations. Homework. Test prep. Assessments. So what can you do? How can you create an environment that includes time away from tech, without doubling your workload or abandoning great digital resources? Where to Go From Here First, evaluate what you’re already doing. Create a simple outline of your week or unit. Highlight the activities that are screen-free. Really, physically write or type this out! Are none to be found? No judgment here. Today is the perfect day to try something new. When you have a visual sense of your week or unit, purposefully schedule in non-tech related experiences (emphasis on creating a real EXPERIENCE! - more on that below) into your week. If your class meets 5/5 days each week, could 1-2 classes include non-tech activities? If your school follows block scheduling, maybe it’s only a portion of the class. What matters is that there are regular, meaningful, and engaging elements to your classroom that allow students to learn outside of a screen. When planning your non-tech experiences, start your brainstorm with the memorable ones you had growing up. Maybe this included color-coded notes, skits, drawing, an extension project, interviews, use of math manipulatives, or a printed activity connected to your unit (Check out my paper airplane coordinate plane activity, geometry construction art, doodle notes, or simplifying rational expression golf game for ideas!).  A Worksheet is a Fine, but an Experience is Better If you’re a teacher, you have had to muster up some creativity on more than one occasion. When planning a non-tech activity, ask yourself this question: “How can I immerse my class in a way that completely hooks them?” Adding music, some simple decorations, colored paper, a snack that connects to the content, use of realia (items from the real world used for instruction), etc. Make a plan, set a budget, and light your classroom up with something different.  A Word to the Wise Repeat after me: Paper (...paper). Does not (...does NOT). Make (...make). My lesson (...my lesson). Effective (...effective). That’s right, simply using paper rather than a device does not guarantee effectiveness. In the same way that using a device does not directly correlate to increased student learning, the reverse is also true. The activity must be purposeful. It must be an appropriate level of difficulty. And it must be well-executed by you, the classroom leader. A Print-And-Go Challenge Do you want to take this issue to the next level? How about a week-long challenge that asks students to avoid all non-academic screen time? They’ll still need to complete homework online and respond to their parents’ texts, but scrolling on Instagram or the nightly video game binge is fair game to be cut. You can begin by opening up a 15-20 minute conversation using these questions. Print and hang them around the room, provide colored post-its for comments, and create a gallery-walk discussion. You could also project them to your whiteboard and simply ask the questions.  Pro tip: If you ask for their experiences with screen time, don’t immediately lecture them for their screen time. Makes sense, right? Invite them to share and keep the conversation light-hearted (i.e. “Wow! All that time on Tiktok and you still play varsity basketball? I’m impressed. I wonder how drastically your game would improve if you converted those scrolling hours into time spent shooting baskets in the driveway…”) After asking about their habits and honest opinions, offer them a screen-free challenge. Here’s a daily tracker with alternative ideas for when they feel the urge to click on that screen. If they can print an assignment, such as an article, to minimize screen time, even better. You can also organize a competition between periods. Create a bar graph on your wall that tracks how many students fully avoid non-academic tech each day. Stoke some friendly competition. Those high schoolers may surprise you with how invested they become! Walk the Walk Off the top of your head, you could likely name a few times that an adult in your life told you one thing, then did another. Frustrating, wasn’t it? As a classroom teacher, students witness not only your content knowledge. They see your habits, demeanor, and attitude. They have a front row seat to a trusted adult who ISN’T their mom and dad. Checking your phone at the back of the room sends a confusing message. If you model healthy boundaries with technology and are truly present while teaching, they will notice. We know students are always watching: let’s be the example every child deserves.  Let us be a fly on your wall!
What non-tech activities are you already using in the classroom? Are you integrating some of these fun screen-free games and activities? Do you have a go-to screen-free activity that is always a hit? We’re eager to hear what that class period looks like. Share with us below! Who might need to hear this message? If you have a colleague struggling to garner up engagement in the classroom, send this article their way! This perspective may be just what’s needed to reignite that classroom spark. References: 1: https://hms.harvard.edu/news/screen-time-brain 2: https://www.hhs.gov/sites/default/files/sg-youth-mental-health-social-me 3: https://www.jpedhc.org/article/S0891-5245(21)00126-7/abstract 4: https://journals.plos.org/plosone/article?id=10.1371/journal.pone.0099478 5: https://www.sciencedirect.com/science/article/abs/pii/S001393511830015X 6: https://www.ncbi.nlm.nih.gov/pmc/articles/PMC7473739/
10 Comments
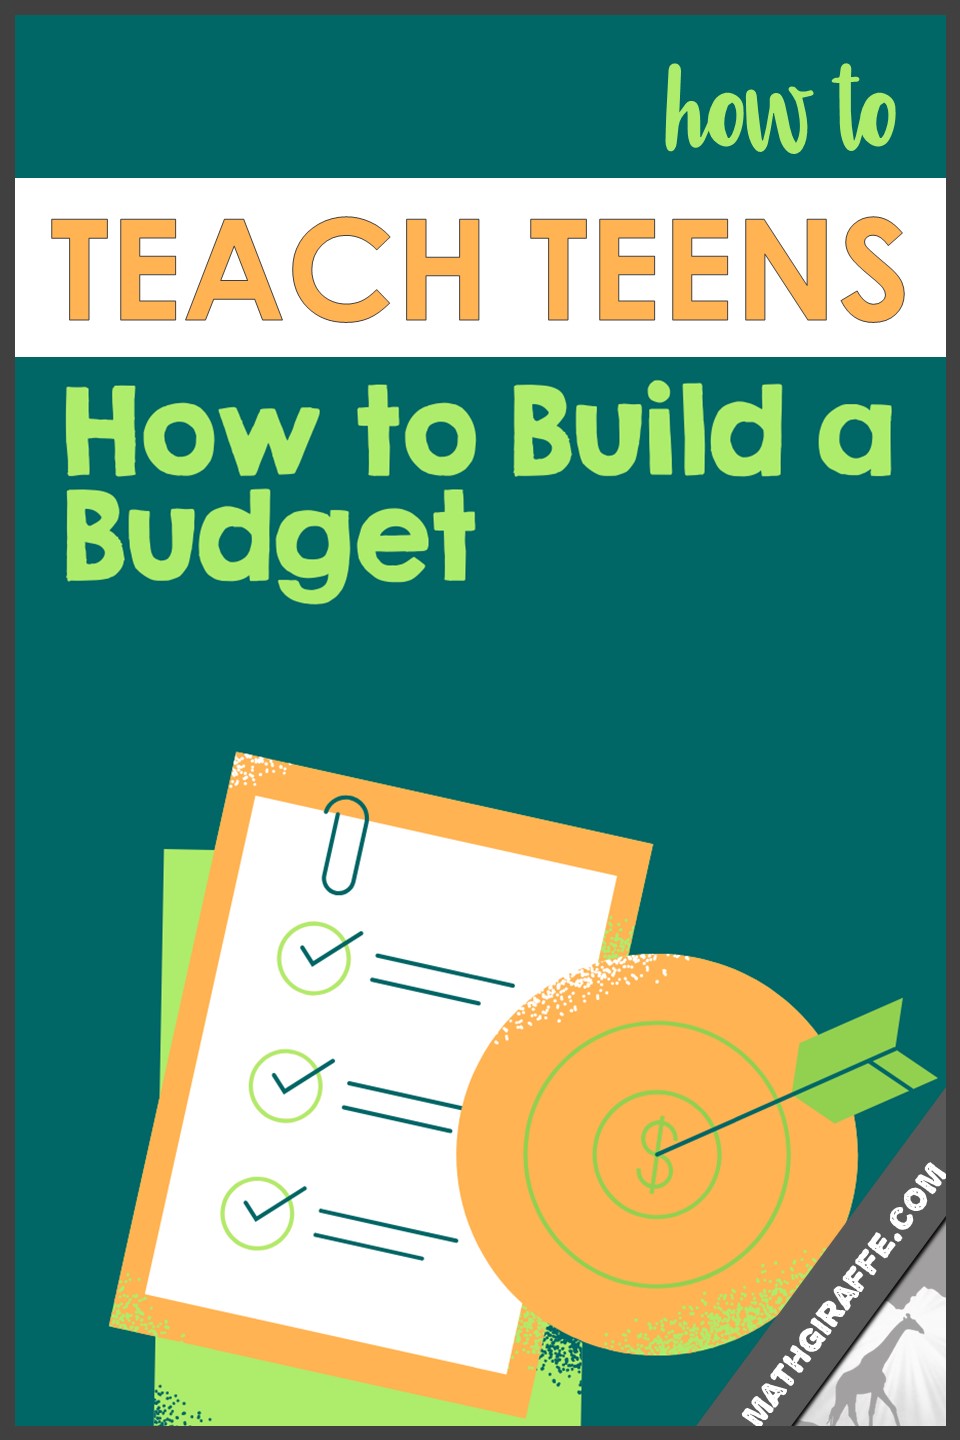 “I can’t wait to grow up!” “Having independence from my parents is all I want!” “Being on my own is going to be the absolute best.” Have you ever had flashbacks to these types of thoughts or conversations? …And subsequently cringed? For most, meals magically appearing on the table and bills never having your name was a portion of childhood that ended before you knew it mattered. It goes without saying that there are endless benefits of living a fully adult life: freedom, growth, and independence to name a few. Yet those benefits can easily be tainted by a complicated financial life. As a classroom teacher, you can play a pivotal role in positively shaping a teenager’s financial future. If you teach middle or high school students, introduce them to the basics of budgeting so that they don't end up in a sticky situation in life. So many graduates are not prepared for a healthy financial future. Don't let your students be in this group.  Money Lessons? But I Have so Much Standard Math Curriculum! Yes, you do. And those skills are building neurological connections, developing problem solving skills, and meeting coursework requirements. It's certainly a heavy load. However, you have future adults sitting in front of you. Adults who will need to manage their own lives with concrete skills. As you know, money management is essential within that skill set. Unless the entirety of your class will have 1:1 financial planners alongside them for the next 80 years, this is critical stuff that needs to be taught. For starters, look for a good place within your scope and sequence to place these lessons. Do you have a few months without a long weekend? A unique set of lessons might spice things up. How about when returning from a break? Those days usually have a slower start anyway. Instead of throwing on a movie (that students may simply text throughout, anyway), pick a spot within the semester and go for it. Someday your students may reach out to you on social media and thank you. The Unfortunate Reality Think about the following statement from page 31 of the Federal Reserve’s recent publication, “Economic Well-Being of U.S. Households in 2022.” ”When faced with a hypothetical expense of $400, 63 percent of all adults in 2022 said they would have covered it exclusively using cash, savings, or a credit card paid off at the next statement (referred to, altogether, as “cash or its equivalent”). The remainder said they would have paid by borrowing or selling something, or said they would not have been able to cover the expense.” [1] This means that 37% of Americans, not a negligible amount of people, could not pay for an unexpected $400 expense. With many expenses far exceeding this amount (a child’s ER visit, a plumbing issue, a veterinarian visit, etc.), it is logical to assume that the number of Americans unable to cover an even larger expense is dramatically higher. Imagine one, or many, of your students fall within that 37%. The Federal Reserve states below the reported ways American say they would cover that expense. [2]  Notice the three highest categories: Put it on a credit card, would not be able to pay, or borrow. All three options lead to either interest, increased stress, unease within relationships, or a combination of the three. Further complicating the issue, many high school students are not being taught any money management skills in the classroom. As of March 2023, only 8 states have fully implemented personal finance course requirements [3]. Eight! More states are in the process of making this change. As a whole, it is common for personal finance classes to be available, but most are not a requirement. 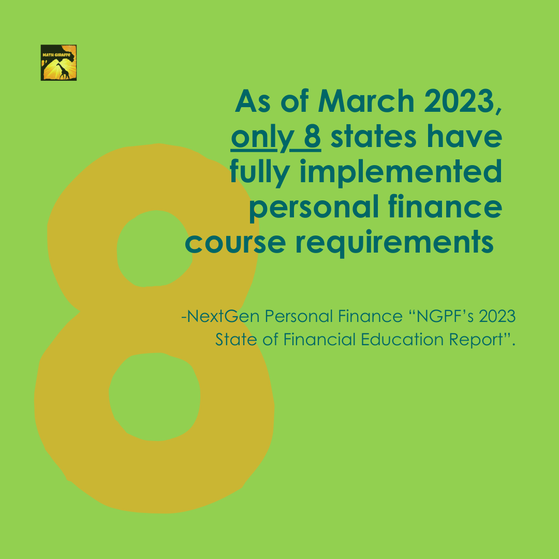 How to Approach the Topic 1) Immerse Them Did you attend any well-decorated birthday parties or high school dances when you were younger? Do you remember that magical feeling of a transformed space? Think about how you can integrate a taste of that into your unit. Green butcher paper cut in the shape of a dollar bill, a few streamers, a themed Powerpoint slide upon entry, and “For the Love of Money” by The O’Jays playing… who wouldn’t be willing to hear what their teacher had to say? Set a budget and time limit you’re willing to spend, and see how creative you can get within those boundaries. 2) Start by dreaming! Beginning a critical topic such as money warrants a strong opening. And putting a good taste in their mouth is a wise way to engage from the get go. So, start by getting them to dream! First, give thought to how your particular group of students will respond best. Are they the share-their-soul talking type? They may dive right into discussion questions posted on the front board. Are they a bit shy but willing to share with some prompting? Post these discussion questions around the room, give students post-it notes, and direct them through a gallery walk to post their responses. Students can write their initials in a specific part of the post-it. Open up a conversation by pulling a few of these responses, encouraging students to elaborate, or read out strong or thought-provoking comments. Do your students stare at you like the leads of The Breakfast Club? No fear. Post the question prompts on the front board, one at a time, then allow a few minutes for writing on a piece of scratch paper. Circulate while they write, slyly looking for interesting answers. Whisper to those students that you’re going to call on them for their answer to #2, #5, etc. Don’t forget to mark your chosen names down on your own tracker. 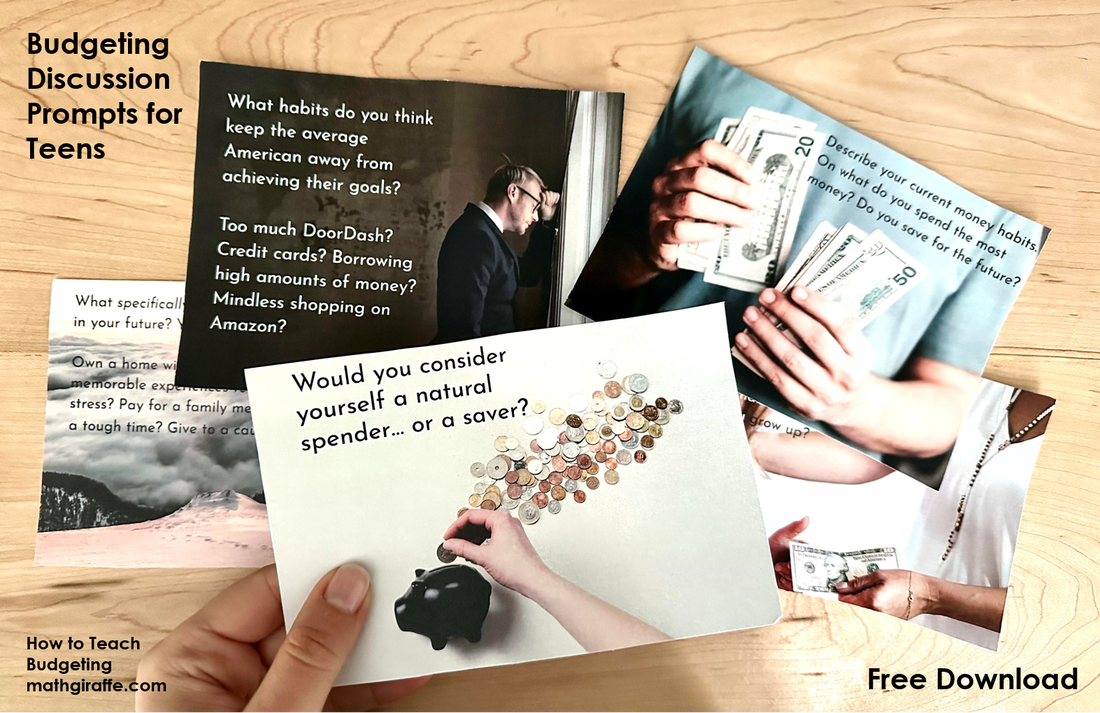 Remember that ALL of these approaches will do better with an enthusiastic and authentic opening from YOU! Your script can sound something like this, “Good morning, everybody! Take a look around. Any guesses what we’ll be diving into this week? *A sarcastic 16-year old mutters “Uhh…money”* …Yes, not but not just anyone’s money…YOUR money! This week we will learn about how you can live the life you dream of, a life after minimum-pay summer jobs and living at your parents’ house. Remember guys, your parents’ kitchen and wallet will not always be accessible for your use…yes, this may come as sad news.” We’re going to start by thinking about your WHY. Why does managing money even matter? Well, do you dream of living in a home with a backyard? Traveling the world? Giving your kids memorable experiences? Being able to afford rent or a mortgage without stress? Paying for a family member or friend who is going through a tough time? Giving to a cause that is important to you? Everyone’s motivation could be different. This week is about the skills needed to build that life. Let’s start by getting specific about what YOU envision for your future. ” Of course your tone and approach (discussion right away, gallery walk, written reflection, a variation of those ideas, etc) can vary between periods and what feels natural for you. What matters is that you open strong (in other words, have some fun) and begin with the WHY. Gathering insight into your students’ future goals, whether aloud or in writing, will likely excite you too. Don’t skip this part. 3) Explanation of the Details There are a multitude of ways to budget! Today we’ll outline two possible approaches. However, before beginning this instruction, ensure you front load with this key message: A. Budget. Is. A. Work. In. Progress. It is a plan that shifts and changes as life circumstances (expectations, children’s costs, medical bills, income, etc.) change. Frame this idea with lots of hope. Phrases such as “Do not get discouraged if your numbers don’t add up right away!” or “It is normal to be shocked at all the costs!” or “Remember your why!” can lessen the frustration and disregard for this critical practice. Repeat this idea throughout your unit. First, familiarize students with the idea of withholdings. Students will need to know that taxes, healthcare, etc. are taken away before the paycheck even touches your bank account. Secondly, give students a sample salary. This will then be divided into the needs, wants, and savings sections. Now, you are ready to teach two standard budgeting plans.  Teach Standard Plan #1: 50%, 30%, 20% This plan allows 50% of your net pay for needs, 30% for wants, and 20% for savings. -Remember that these need to add up to 100%. 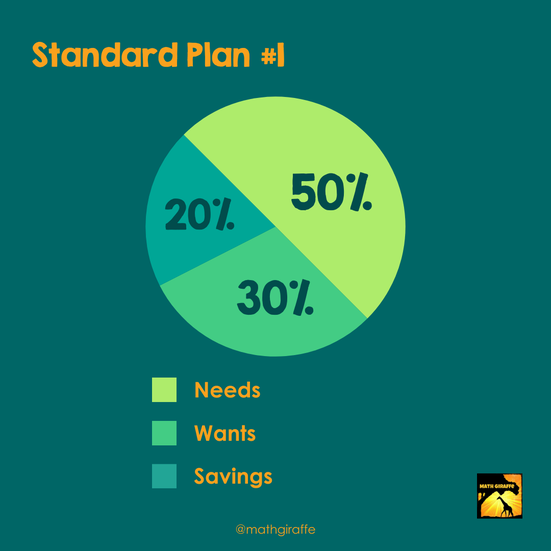 Teach Standard Plan #2: 70%, 20%, 10% If your budget is a bit tighter, this is also a satisfactory option. This allows for 70% toward needs, 20% towards wants, and 10% for savings. If your income is lower, you’ll need to focus more towards needs. This can change as your income increases. But remember, increase your savings before increasing your wants section. 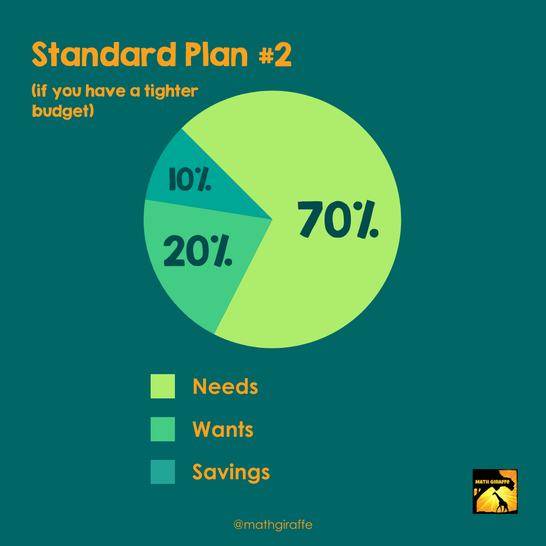 This explanation is based on the budgeting approach within Math Giraffe’s Finance Doodle Notebook. You can get the workbook here if you'd like to have resources to bring this critical skill to life! Using the pages in the book, or just a blank sheet of paper, walk students through the process: 1. Choose the 50/30/20 or 70/20/10 plan. Which one do you think will work better for you right now? 2. Divide appropriately and choose one color for each category. We will be color coding! Calculate what 50%, 30%, and 20% are for your total budget. (Or if you chose the 70/20/10 approach, calculate based on those percentages.) 3. Using a piece of scratch paper, make a complete list of what subcategories will fit inside each category. No numbers needed yet! Repeat this process for both the needs and wants categories. For example: - Needs: Food, transportation costs, housing, utilities, etc. - Wants: Streaming services, shopping, gifts for friends, restaurants, etc. - Savings: Emergency fund, funds for big purchases, retirement, etc 4. Play with your numbers. Begin plugging in the percentage costs. Remember those numbers must fit within the allotted portion: 50%, 30%, etc. 5. Come back to your pie chart. Now it’s time to break down each colored category with all the subcategories you identified. This will help you visualize where the money is really going! Decide a pattern for each sub category (transportation, restaurants, etc). Be sure to note that pattern on the key to your left. 7. It is perfectly okay to re-work this if it needs to change! Reiterate to students that budgeting is a learned skill that takes patience and practice. Model this patience. 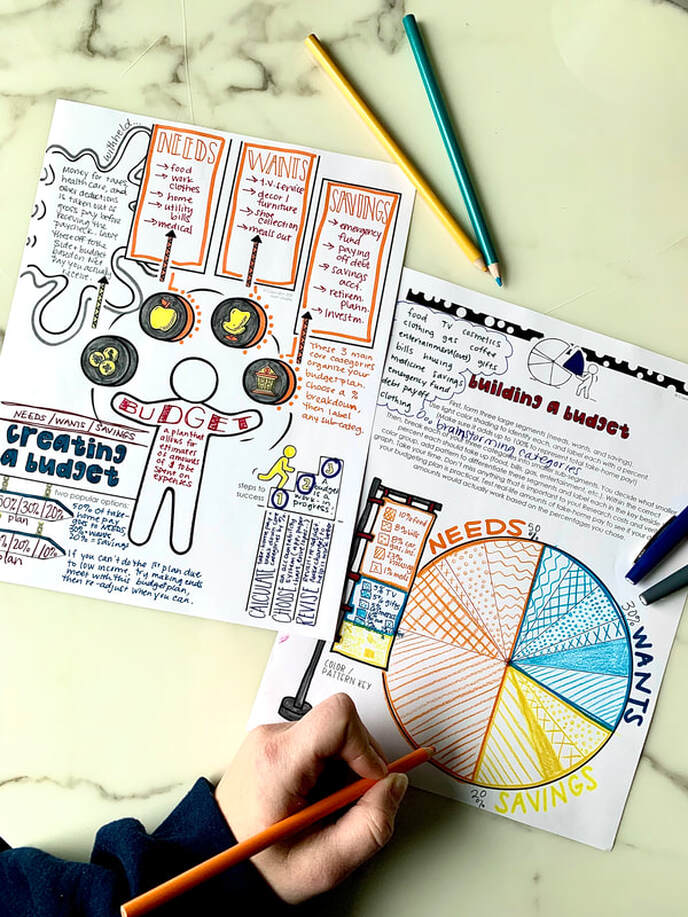 In the sample above, the students will select patterns to use for the more specific categories within each color-coded section. This visual budgeting process helps them break down the costs and really understand how the plan they chose (either the 70-20-10 plan or the 50-30-20 plan) really works. The workbook pages shown are available here if you'd like your students to have the structured guidance. On a Personal Note - For the Teacher It is worth recognizing that finances are incredibly personal. What did you see modeled to you as a child? Did anyone have conversations about spending, saving, or the risks of debt? Was money a stressful or taboo topic? Our history and current financial landscape can have a strong effect on how willing we are to engage with these concepts. You will likely feel more confident in your instruction if you first familiarize yourself with the concepts and do a bit of self-reflection. Reflection Questions for You, the Adult:
 A Few More Elements for Lasting Success Highlight the Concept of Contentment When someone has true control of their financial landscape, contentment is present on some level. If the person does not have contentment but is not struggling financially, they simply have a large amount of money; they are not in true control. When teaching this unit, be sure to intentionally spend 10-15 minutes teaching the practice of “contentment” and giving clear examples. Now, this does not mean you must tell students to never live in a nice home, enjoy luxurious vacations, or the like. Contentment is simply the idea that no matter where you are in your financial journey, there can be satisfaction and gratitude right then and there. Looking for high school-related examples? A few are listed below. 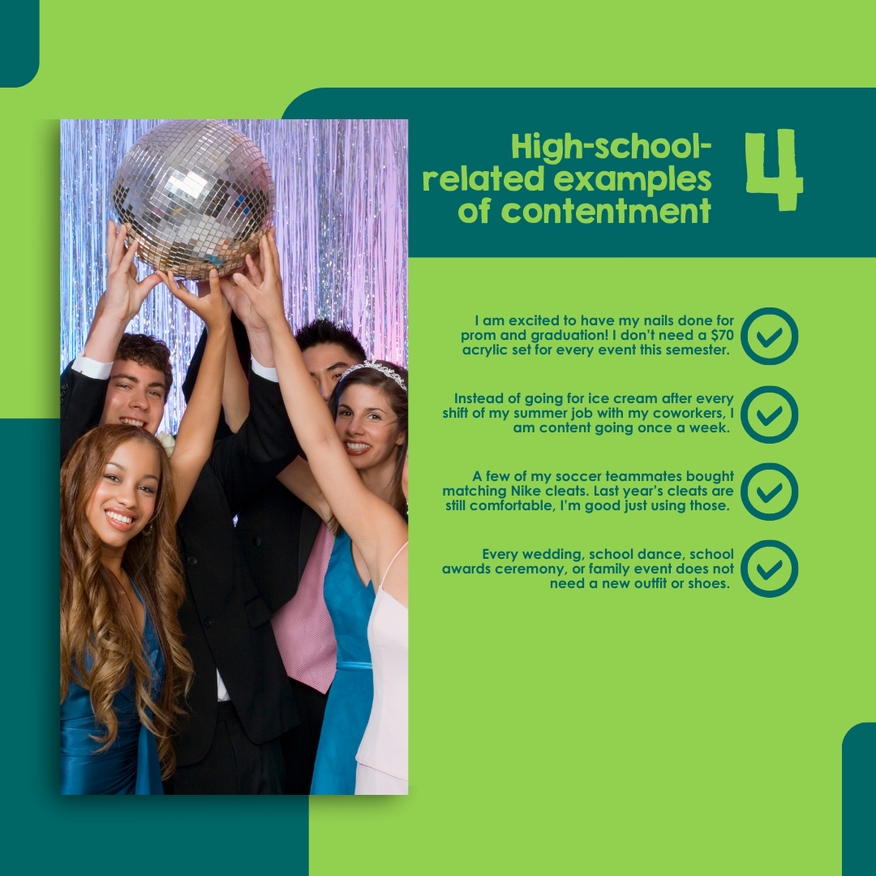 Contentment is a powerful practice but is incredibly countercultural: Acrylic nails, DoorDash orders, Starbucks, and Amazon Prime are now considered normal parts of many young adult lives. For this reason and countless others, including contentment in your instruction is both healthy and critical for lasting success. Communicate with Parents In the high school setting, this may or may not be part of your current classroom procedures. Consider sending a message or brightly colored handout that shares a few key points about what you’ve taught. It could open up good conversation within a few families. Talk about Generosity by Planting Seeds By first discussing students’ WHY, you are already deeping the impact of your instruction. However, there is another layer that adds meaning: Generosity. Throw out a few ideas about organizations that you can give to: A children’s hospital, an animal shelter, your church, even a family member or stranger who needs a boost! Invite students to share aloud who or where they may want to help. This could plant seeds that will bear fruit for years to come. 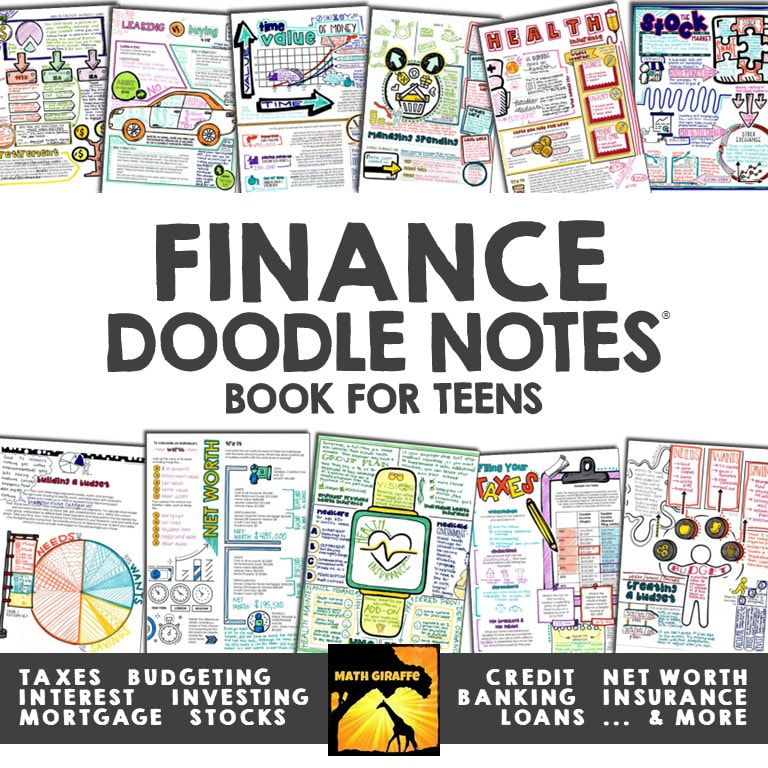 Looking for More?
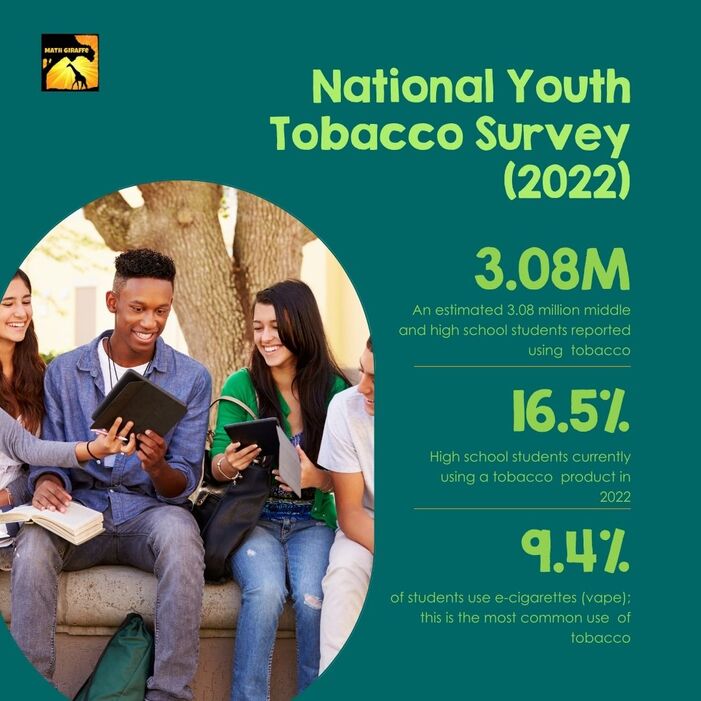
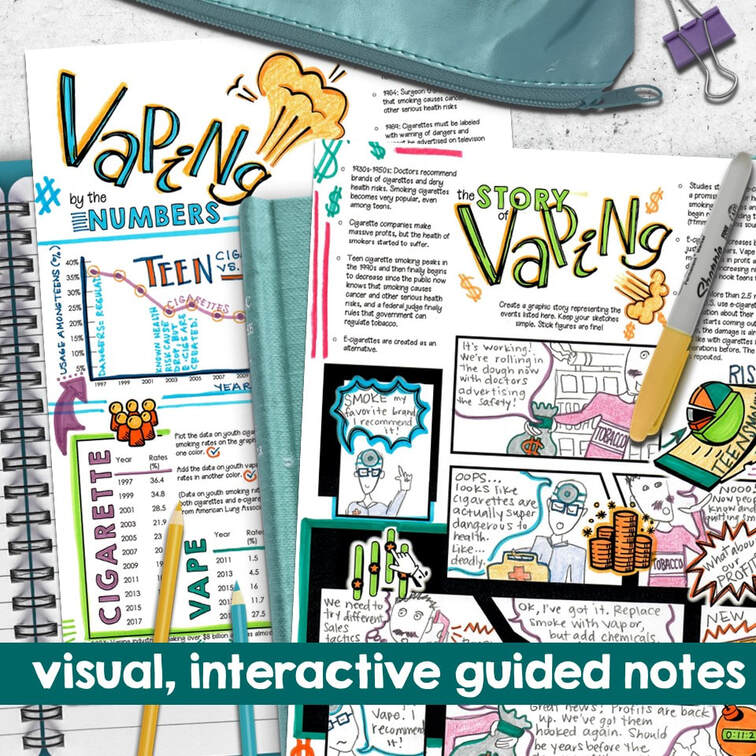
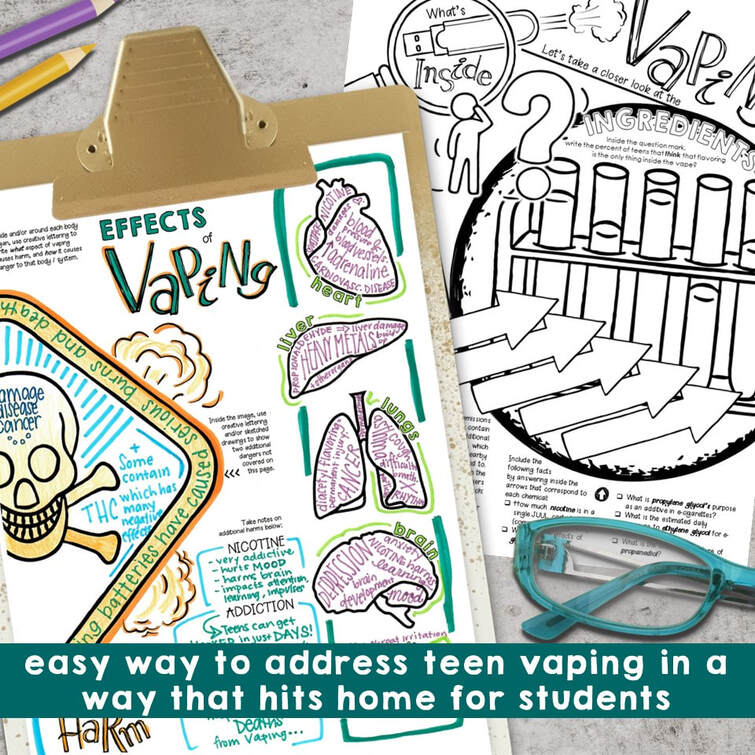
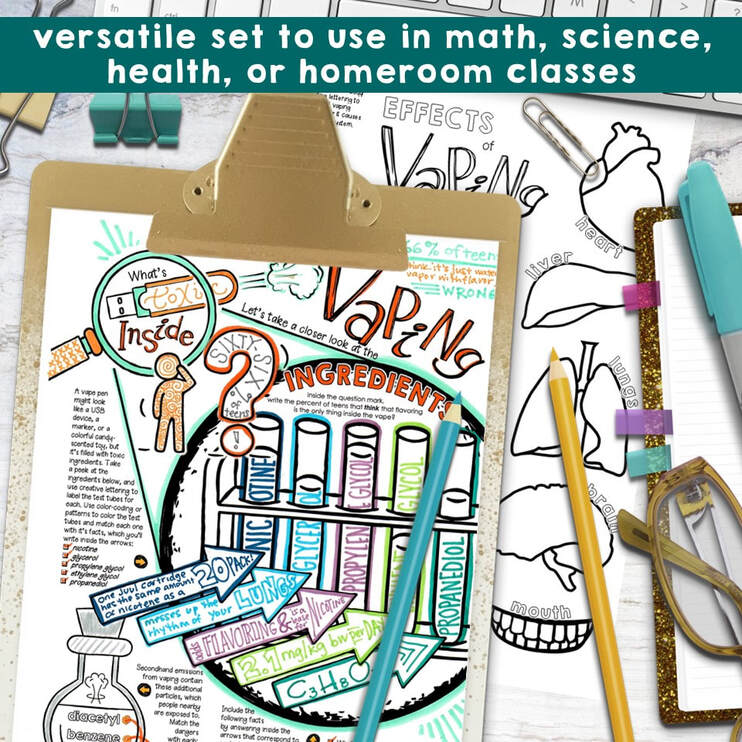
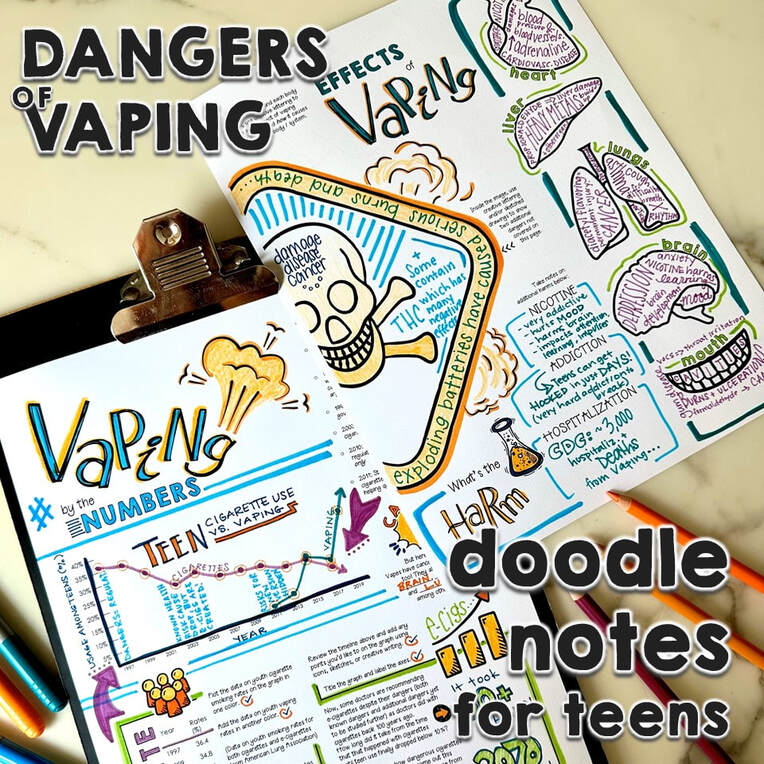
Alright, so you’re sold. Money matters, and teenagers need to have the building blocks for how to manage it. With a topic as big as money, let Math Giraffe lighten your load. Net worth, taxes, mortgages, and more are taught in Math Giraffe’s Finance Doodle Notebook here. The more of these lessons you include in your classroom, the more empowered your students (future adults, remember!) will be. 1-Federal Reserve publication: ”Economic Well-Being of U.S. Households in 2022” 2- Federal Reserve publication: ”Economic Well-Being of U.S. Households in 2022” 3- NextGen Personal Finance “NGPF’s 2023 State of Financial Education Report” 7/31/2023 6 Comments Vaping is Overwhelming High Schools & Middle Schools. How Can We Help Our Teens?Scary Stat: 66% of teens think that the only thing in their vape pen is harmless candy flavoring.
|
Archives
December 2023
Click to set custom HTML
|


 RSS Feed