
|
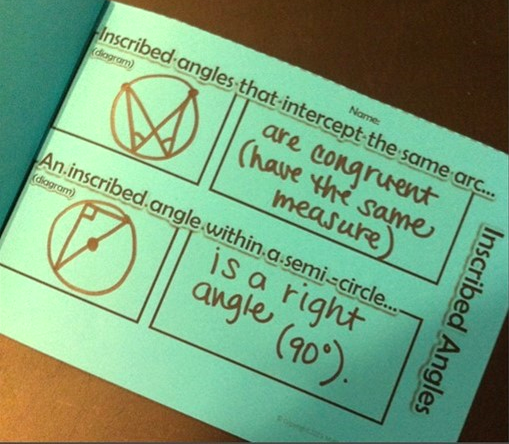
11/17/2022 13 Comments Teaching Circle TheoremsHow to Teach Properties of Circles for Deeper Understanding & Stronger Retention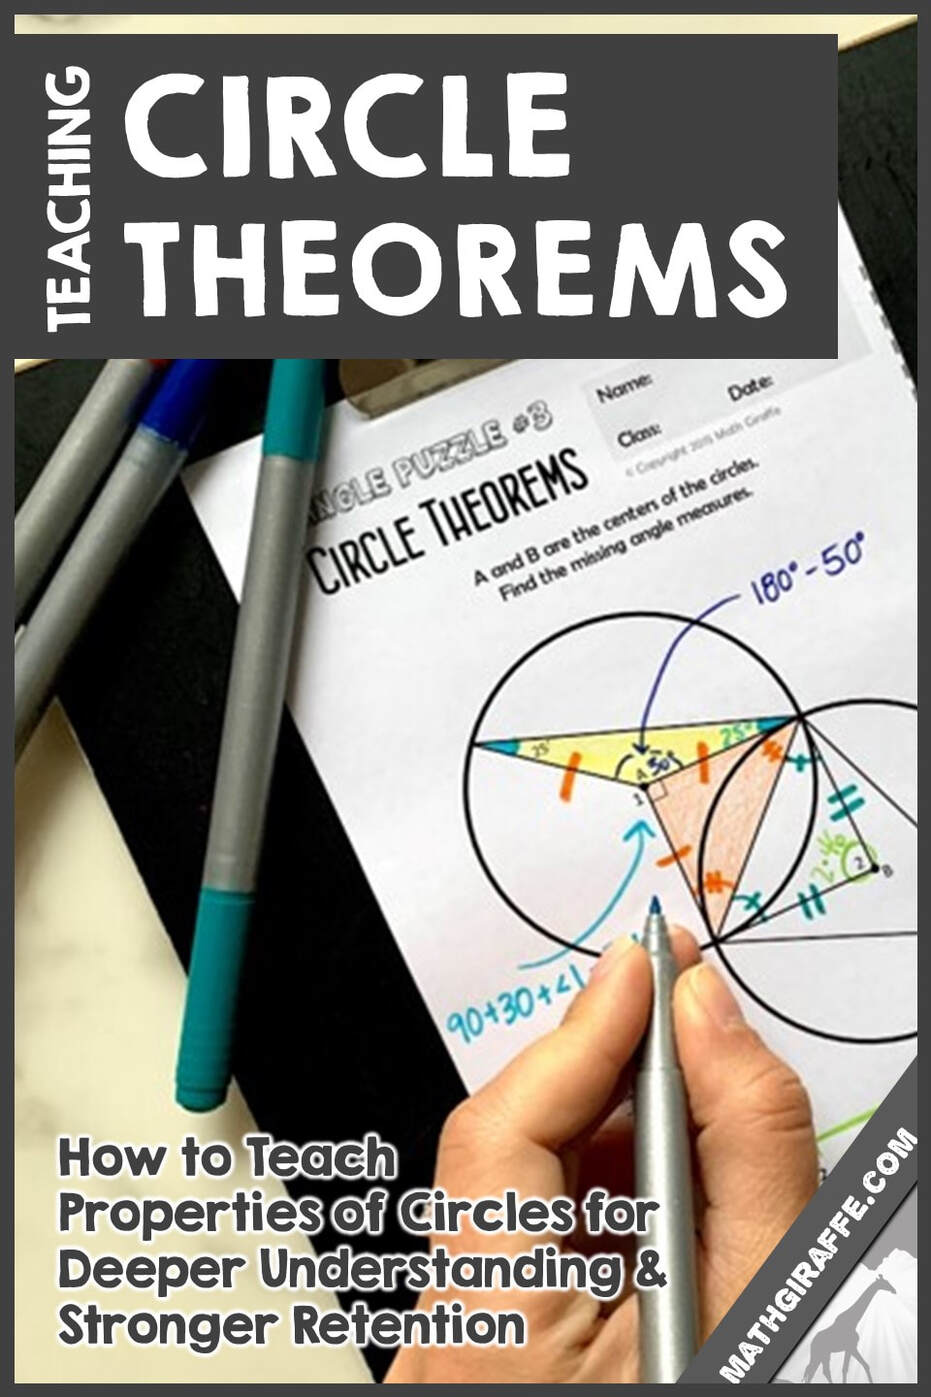 * (Note - Don't miss the free download at the end of this post.) In high school Geometry, we need students to not only be able to use theorems properly in proof writing and problem solving, we need them to also understand them on a deeper level and be able to reproduce them as needed. We also want them to be able to recall the theorems easily so they know which one they have to use. The way to do this is not just through lecture, then memorization! There are a lot of circle theorems, and to your students, it probably feels like they all just blur together unless you really strategize the way you teach them. To introduce new theorems in a way that students can integrate them into their conceptual understanding of how Geometry works, we can use a few strategies. To increase both deep understanding and retention (memory) of theorems, you'll need to: 1. Have students discover the theorems themselves. They'll need to investigate, explore, and actually see the theorem come to life through an inquiry process. Whenever you can use an investigation to allow students to discover properties themselves, understanding of the deeper concept behind a mathematical property is increased. This way, students are able to reproduce the rules, formulas, and procedures for themselves without memorizing because they understand where the rules came from. (A side bonus of using inquiry is that students get a boost in their problem-solving skills. They gain resilience to stick with a challenge and learn to think it through for themselves and develop stronger critical thinking abilities.) For more information on how and why we want to use a discovery lesson as an introduction, check out my inquiry learning page. 2. Engage both brain hemispheres and activate the benefits of dual coding theory. By blending graphic (visual) information with auditory information / words, you'll help students make neural connections that allow them to convert the lesson into long-term memory. You'll see how we do this below, but be sure that you check out my doodle notes hub if you are new to using creative visual note-taking methods in math class. 3. Use color-coding. Colors and color combinations can have an effect on attention and memory. Neuroscientists have found that color is one of the first things to register in our brains, and has a pretty strong impact on learning. Geometry is especially conducive to color coding. Get students in the habit of always having multiple colored pencils out on their desks, and have them always use different colors to mark up diagrams any chance they get! Step By Step Plans: How to Teach Circle Theorems*(First, a quick note: All the specific materials shown in the images are here, so you can get them all in one place and then grab the free download at the end of this post to use in your classroom.) Review definitions if needed before starting. If your students are not confident with naming the parts of a circle, you'll want to go over the vocabulary before throwing them into working with the theorems. It's difficult to understand new theorems if you don't have a good handle on the terms first. Build familiarity with a quick review of the parts of a circle. Doodle notes are a great way to do this in a way that will solidify the meanings of the vocabulary terms in long-term memory. For example, if you have students do their notes as shown below, they'll benefit from the hand-to-mind connection. They'll recall how they filled in the sector with the word "sector" in large letters, and how they wrote or doodled the words "arc" and "circumference" in a curved way and added doodles around the circle to extend it around the entire circumference. They'll remember using one color for all the straight line segments, hand lettering for areas within regions, and another color for the curves. The act of coloring, doodling, sketching, color-coding, or hand lettering their vocabulary terms helps them to convert the words to long-term memory. If your students already are strong in these definitions, you can skip this and move ahead to the investigation. 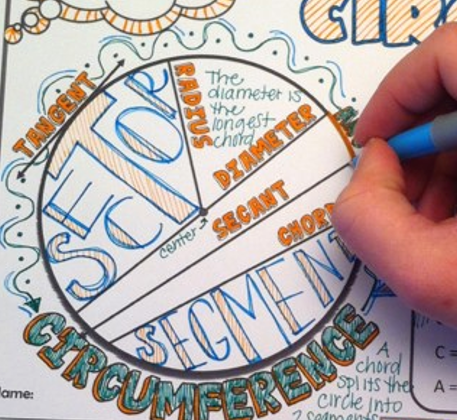 Kick it all off with an investigation lesson Before you do any lecture or notes to introduce circle theorems, allow your class to explore them through a discovery lesson. By developing the rules for the properties themselves, they will actually see how and why the theorems work. They'll understand where these theorems came from when they discover them for themselves. This type of activity works great in pairs. Have students work with a partner to go through the investigation lesson. They'll discover 4 of the circle theorems themselves, using a protractor and straightedge. For example, have your students draw 4 or 5 circles of all different sizes using a compass. Then, direct them to place two points on each circle. Have them draw two different inscribed angles that intercept the same arc. They'll take time to do this for all their circles on their own in pairs, record the measures, and start to make their own observations. Think of it like a science lab. They will look for patterns and see if they can draw any conclusions. Of course, their results may not be perfect. One angle may be 57 degrees and one may be 58 because of variation in the perfection of their lines and their protractor skills and estimations. But by doing it enough times throughout the exploration, they'll start to see some similarities and begin to guess at the property at play. 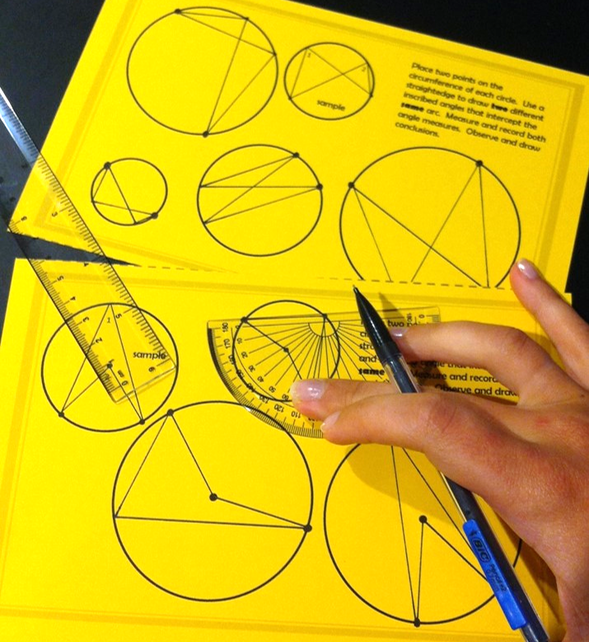 When you teach using inquiry, your most important job is actually to sit back and resist the urge to teach! This can be harder than it sounds. You may need to give supportive hints here and there, but only if a group is truly stuck. Otherwise, make them struggle. It's ok if it's difficult, and you can remind them of that. It's a productive struggle, and they will have stronger learning because of it if they push through. Sometimes they're so used to being spoon-fed the content, that they beg for help and insist it's too hard, but have not really made a real attempt to figure it out themselves. Find the sweet spot where you are being supportive, but without offering them any substantial help. They'll do ok once they see that you really are not going to step in and do it for them. Some students will take longer to get to the point that they realize they really are on their own, but once they see that they really do have to figure it out for themselves, they'll be able to. Just be encouraging. A guided inquiry like this one helps walk them through it so they don't feel quite so lost. Then, they'll write up sentences officially stating the theorems they discovered. My lessons have them do only 4 on their own through investigation. They write those into their booklet where they record the theorems, and then they eventually just will complete the rest of the theorems that are provided for them to eventually cover these 10 theorems:
 Once students have started having those "aha" moments as they discover the first theorems and are able to start writing rules for what they've observed, you'll eventually want to bring them together as a whole class for some direct instruction. Allow the pairs to share what they discovered. Go over the theorems together. Compare how different teams wrote up the rules. Make sure everyone is on the same page and has correctly written up their discoveries. Then, you can go over the remaining theorems. You can give the rest to them as usual. Students should take notes and ensure they've got the idea. You can provide them with a reference guide as well if you'd like. That can be handy for them as they work through proofs and practice problems later on too. I have one included in my circle theorems kit if you'd like to use the materials shown here. 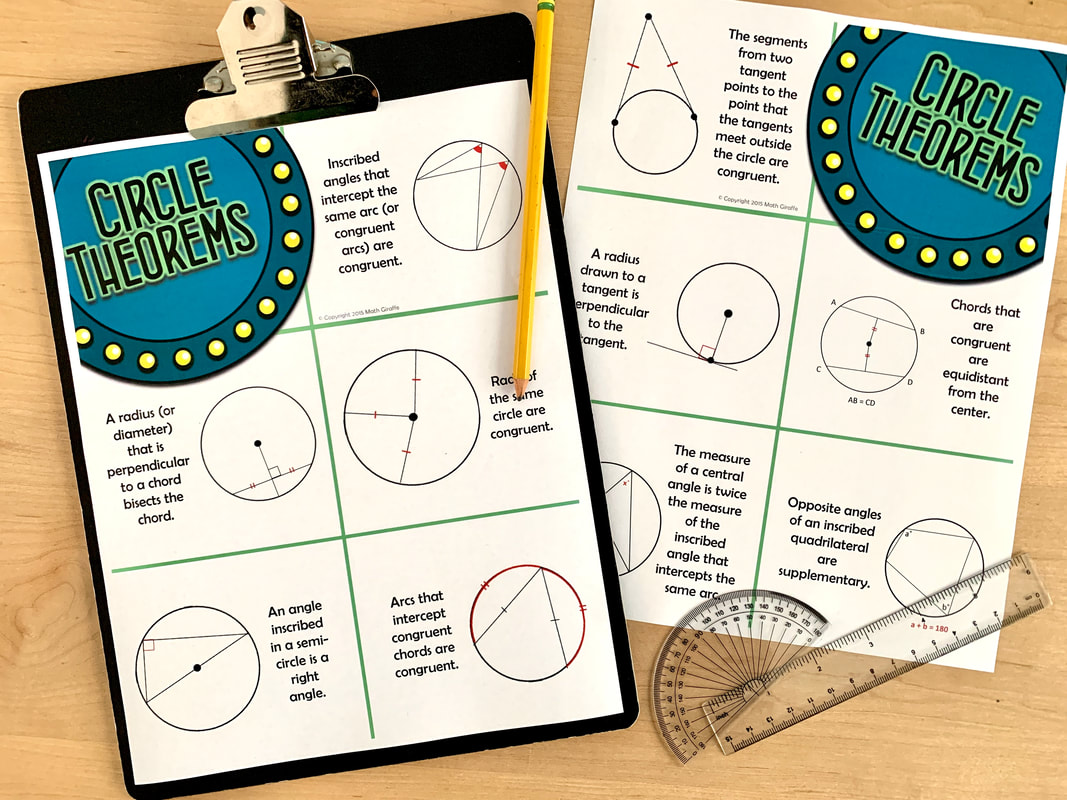 Practice Using the Theorems Before Leading into Proofs Once students are familiar with the theorems, let them try some application problems. Your textbook probably has some basic, boring ones that you can begin with. Do a few in class together, and assign a couple for homework. Then, let your students level up their practice the next day with some fun challenge puzzles. This set has a few different circle theorem puzzles at varying difficulty levels. You can let your class try a couple with partners, then let them take on a more challenging one if they are ready for it. Be careful - puzzle #1 is very tricky. Choose which ones to use wisely ;)  Let students see if they really get it Now it's time to test their knowlege with some critical thinking questions. I love using "always true, sometimes true, or never true" questions to see if students really understand the concept well. This type of questioning forces them to test different cases and try to find examples and counterexamples. It's great for building logical reasoning skills, and for seeing where there may be gaps in knowledge. Use always, sometimes, never challenges with partners if you can. They get some really good "math talk" going in the classroom, and then you can go over them as a whole group and check work while addressing the ones that kids got stuck on. The way I designed mine allows for a quick check as you walk around the room. If they've got it, the colors form a secret pattern that you can use to identify any errors at a glance. (But it's not a predictable enough pattern for kids to guess. Very sneaky...) 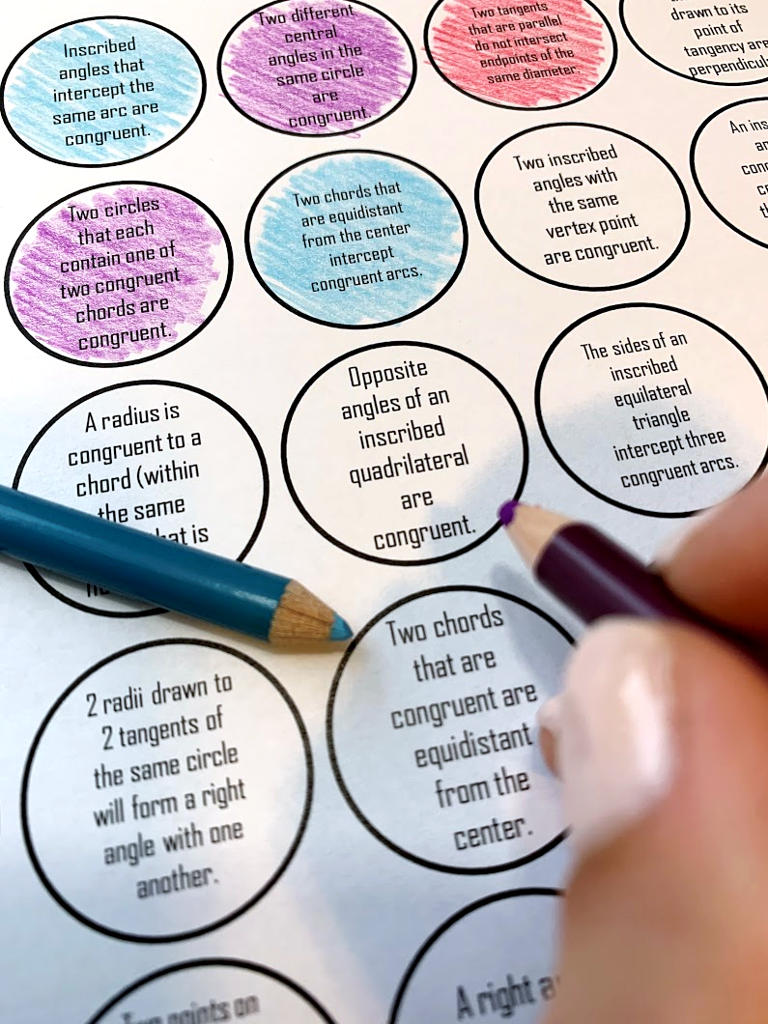 Sum up and review before moving on to proofs Some people like to use their doodle notes as an introduction to a new concept, but a lot of teachers also like them as review. I like blending some of each. You can choose what is best depending on the lesson. And in this case, since the introduction to the lesson was an inquiry activity, the doodle notes make a great sum-up activity to review all the properties / theorems. The circle theorems doodle notes make a great reference guide for students. The creativite aspect helps activate all those magical neural pathways, but also, since they can visualize the layout later on in their minds, they can recall the theorems more easily during a test. This is one of the many benefits of doodle notes. Interacting with the visual notes automatically will activate the brain pathways that lead to stronger retention and also take advantage of the powerful brain hemisphere crossover. 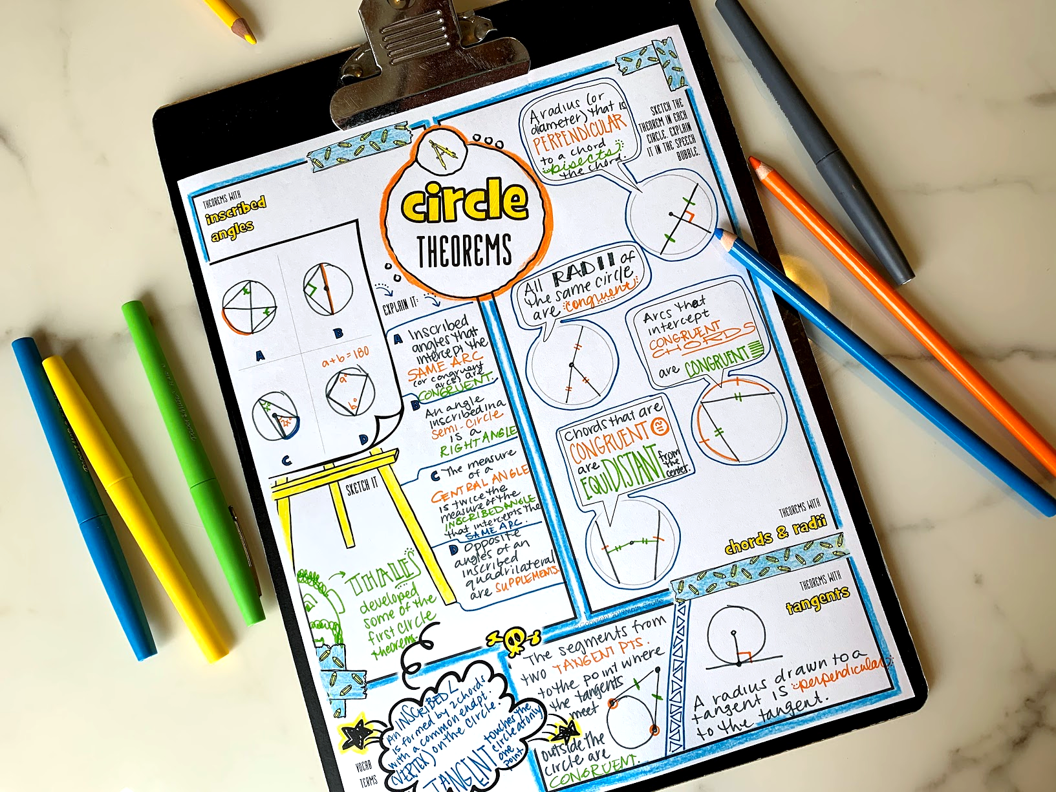 Proof Time! Finally the best part - write some proofs with the theorems. The doodle notes you just finished are perfect for pulling back out to have on hand to peek at during proof writing. This is why I like having that step come right before proofs for this unit. They now will have their theorems organized into three categories on that page:
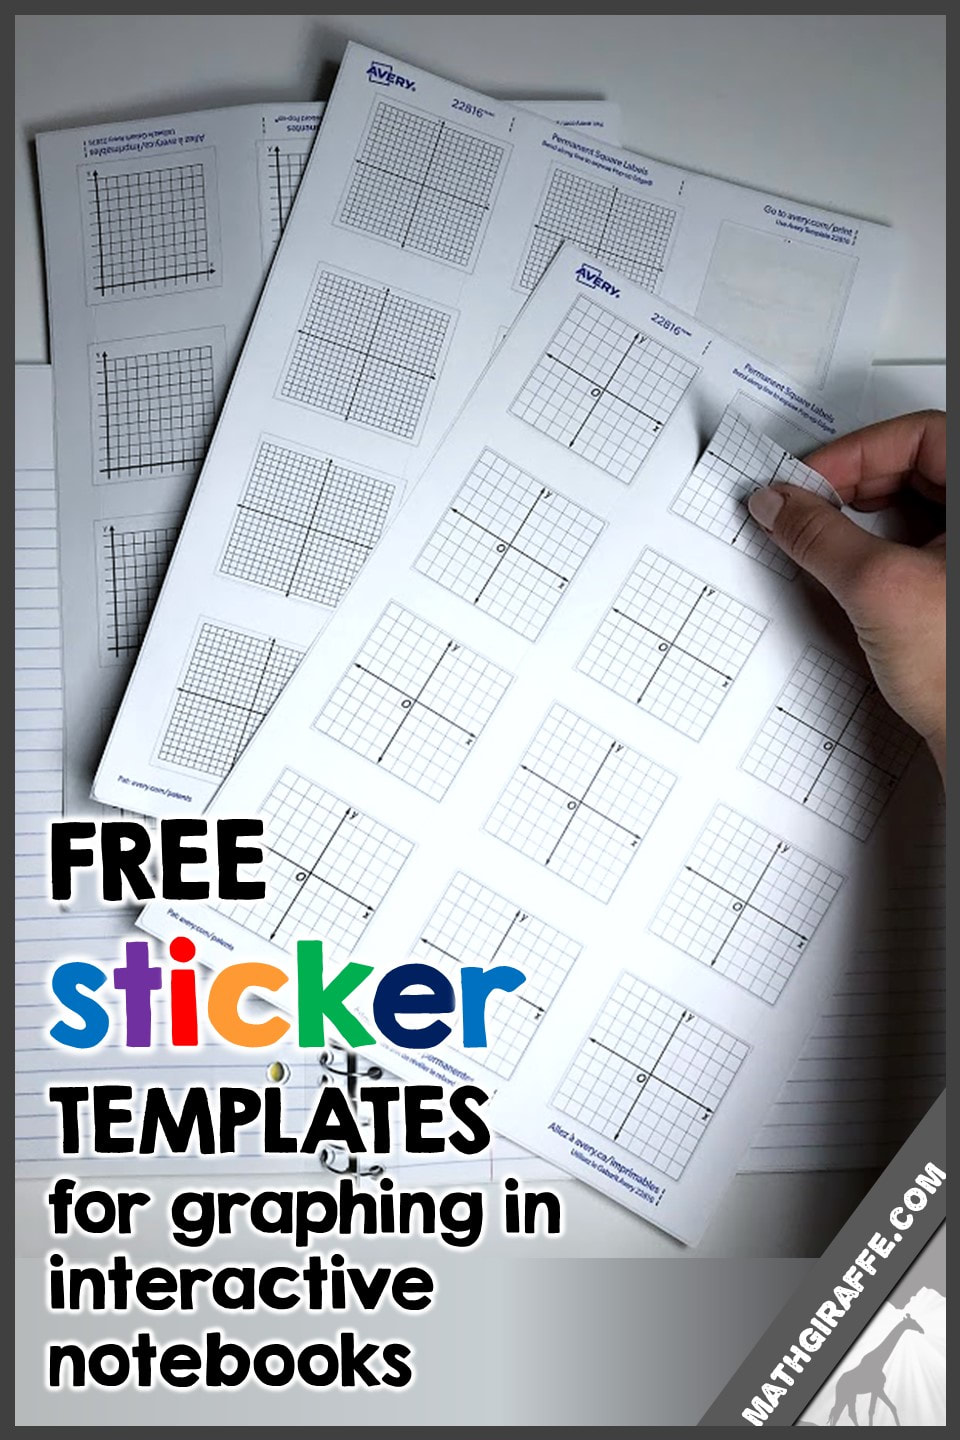
Start with a couple of basic proofs using the theorems with chords and radii. These are a nice beginning point. Then, lead into a couple proofs with inscribed angles next. Then, you can have them try a few on their own before moving on to the theorems with tangents. My big proofs pack has a lot of proofs you can use for this if you need some, or you can just use whatever you've got in your textbook. It's great to have a wide range of proofs that all follow a nice consistent format. Set your students up for success by having the practice proofs organized the same way as the ones on quizzes like those ones are. When you get to the point that you are ready to go more in-depth with the theorems involving tangents, you can use my free diagrams here. 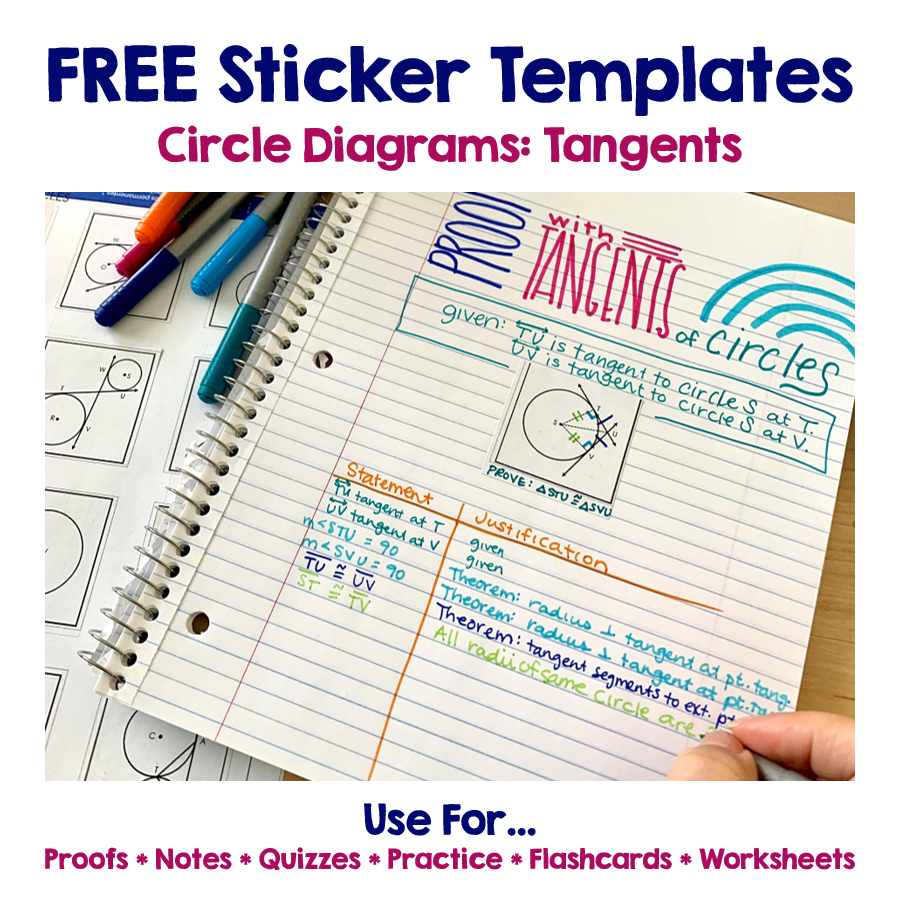 This is a nice way to spice it up. You can use the tangent diagrams in so many ways. I like printing them on label paper so they peel off in perfect squares and kids can stick them right into their notebooks. The free sticker templates make that easy. Click on the button below to download them. You'll just print the pages on square label sheets. (Directions and specifics are included in that free download file.) That way, everyone instantly has all the diagrams right in their notes without having to draw them by hand. It saves a lot of time, and they can still mark them up and use color coding. Encourage your students to use color coding to match up lines of proof with colors in the diagram. Their markings will not only help them to go through the logic and steps and keep everything straight, but they'll also help you with grading. As you review the lines of their proof, it's much easier to see where a student went wrong if you can follow their thought process by following their color coding. 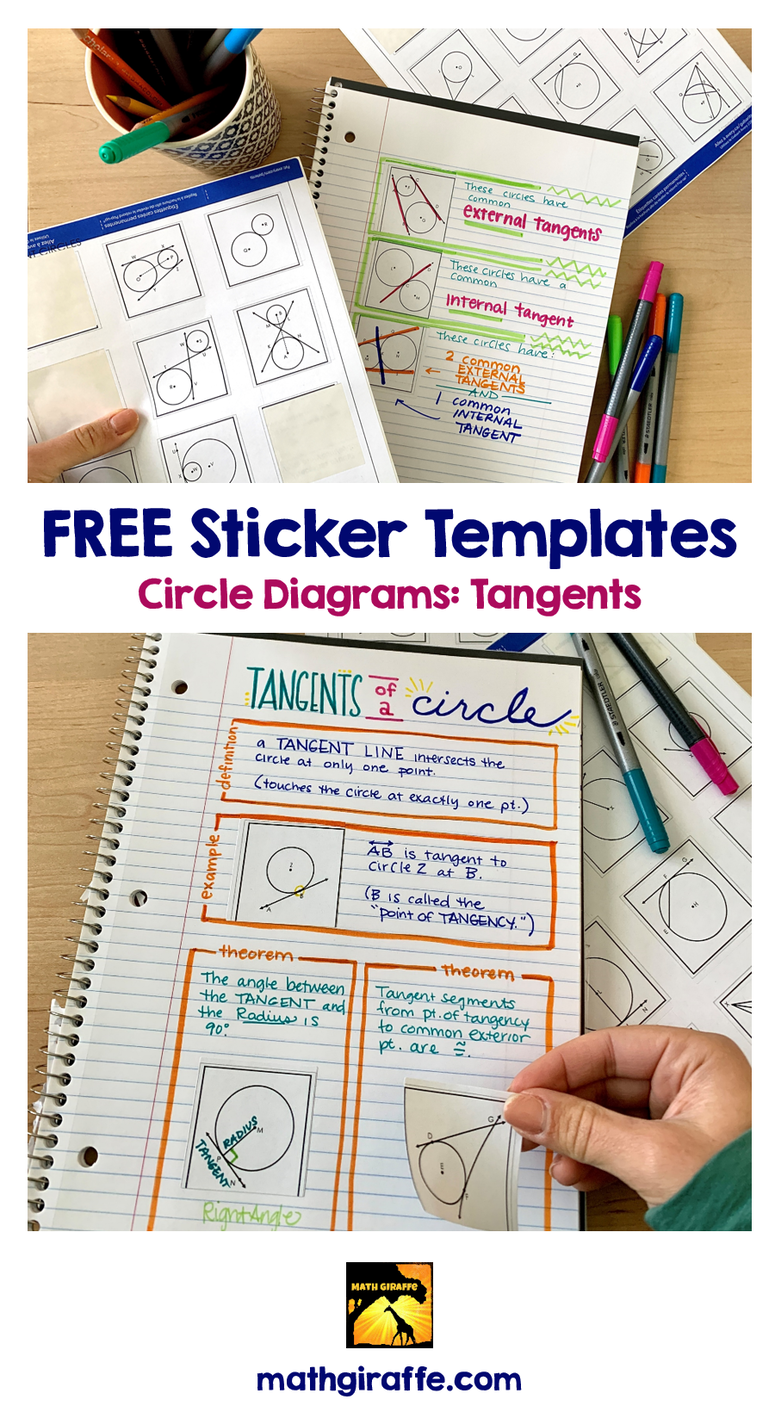 If you don't have label paper, don't worry. You can still use these tangent diagrams and have options. You can either... 1. Print these free tangent diagrams on full-page sticker paper, and students just will have to cut across to divide up the squares before peeling the stickers. ...or... 2. Print the free diagrams on regular paper. Kids will just have to use a glue stick. It still is a really efficient way for them to get the diagrams right into their notes, just not quite as quick and easy as the label method. You can also use these diagrams just for yourself to easily create worksheets, practice problems, or even quizzes. Just stick a few on the page, write your "given" information alongside it, and photocopy! It makes it super simple to build a quick handout. Have fun teaching circle theorems! For an easy to use pack of all the materials shown here, you can grab the Circle Theorems Bundle here. Hopefully these creative methods and activities will not only help you spice it up and get some variety, but also will build deeper understanding and stronger retention for your Geometry students. More Help for Teaching High School Geometry:
13 Comments
10/14/2022 9 Comments How to Teach Geometry ProofsWriting Two-Column Proofs: A Better Way to Sequence Your Proof Unit in High School Geometry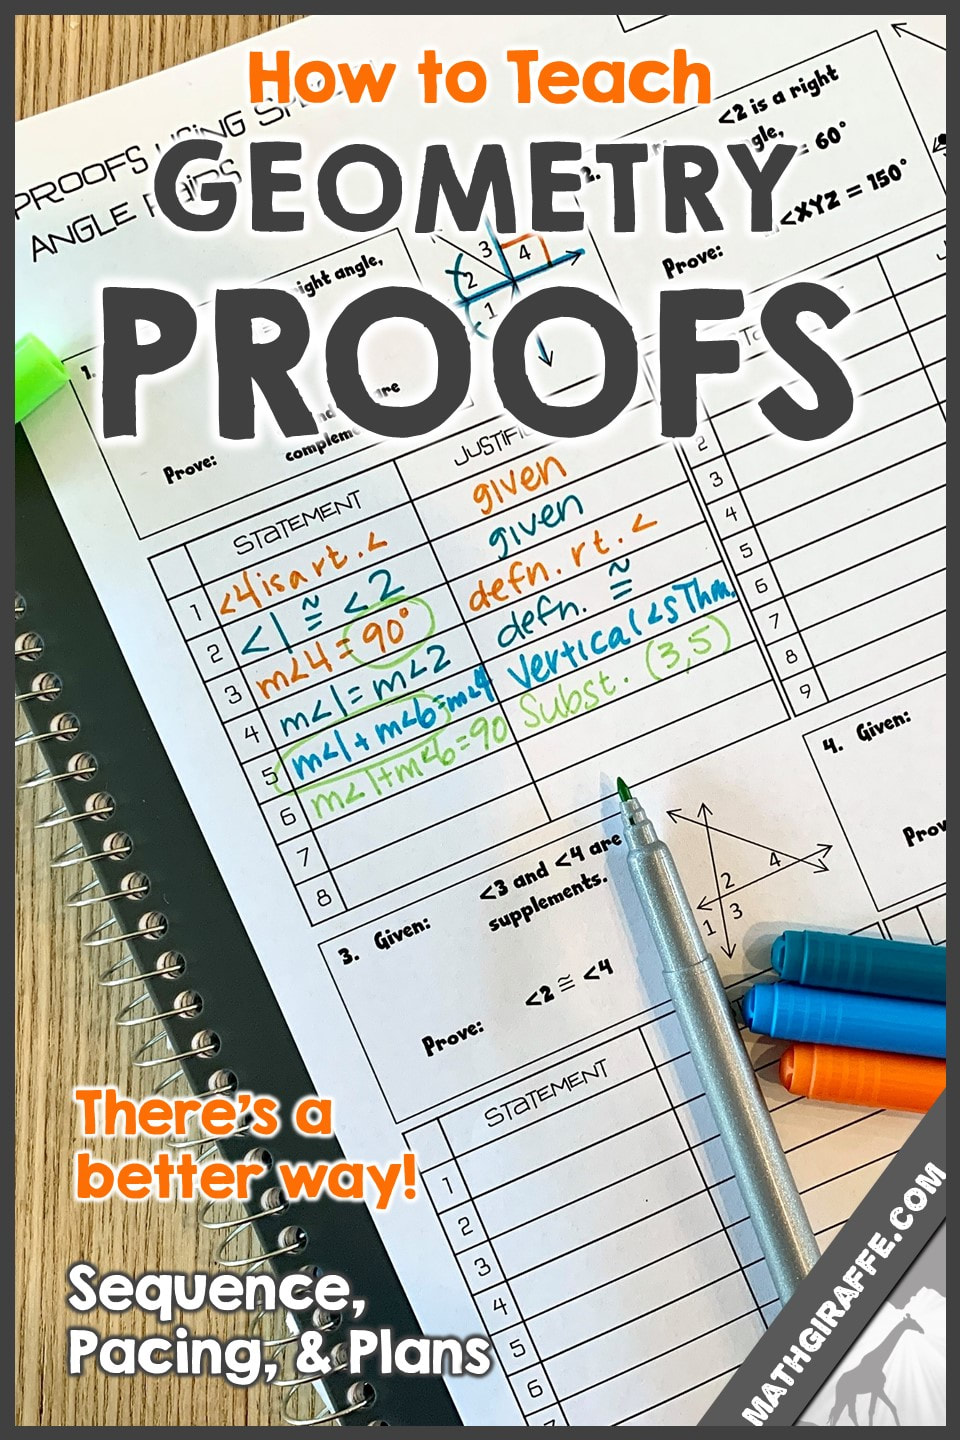
Leading into proof writing is my favorite part of teaching a Geometry course. I really love developing the logic and process for the students. However, I have noticed that there are a few key parts of the process that seem to be missing from the Geometry textbooks.
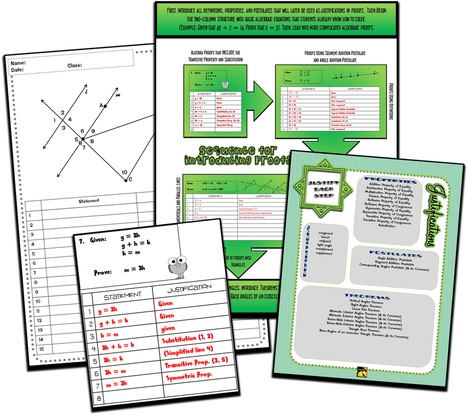
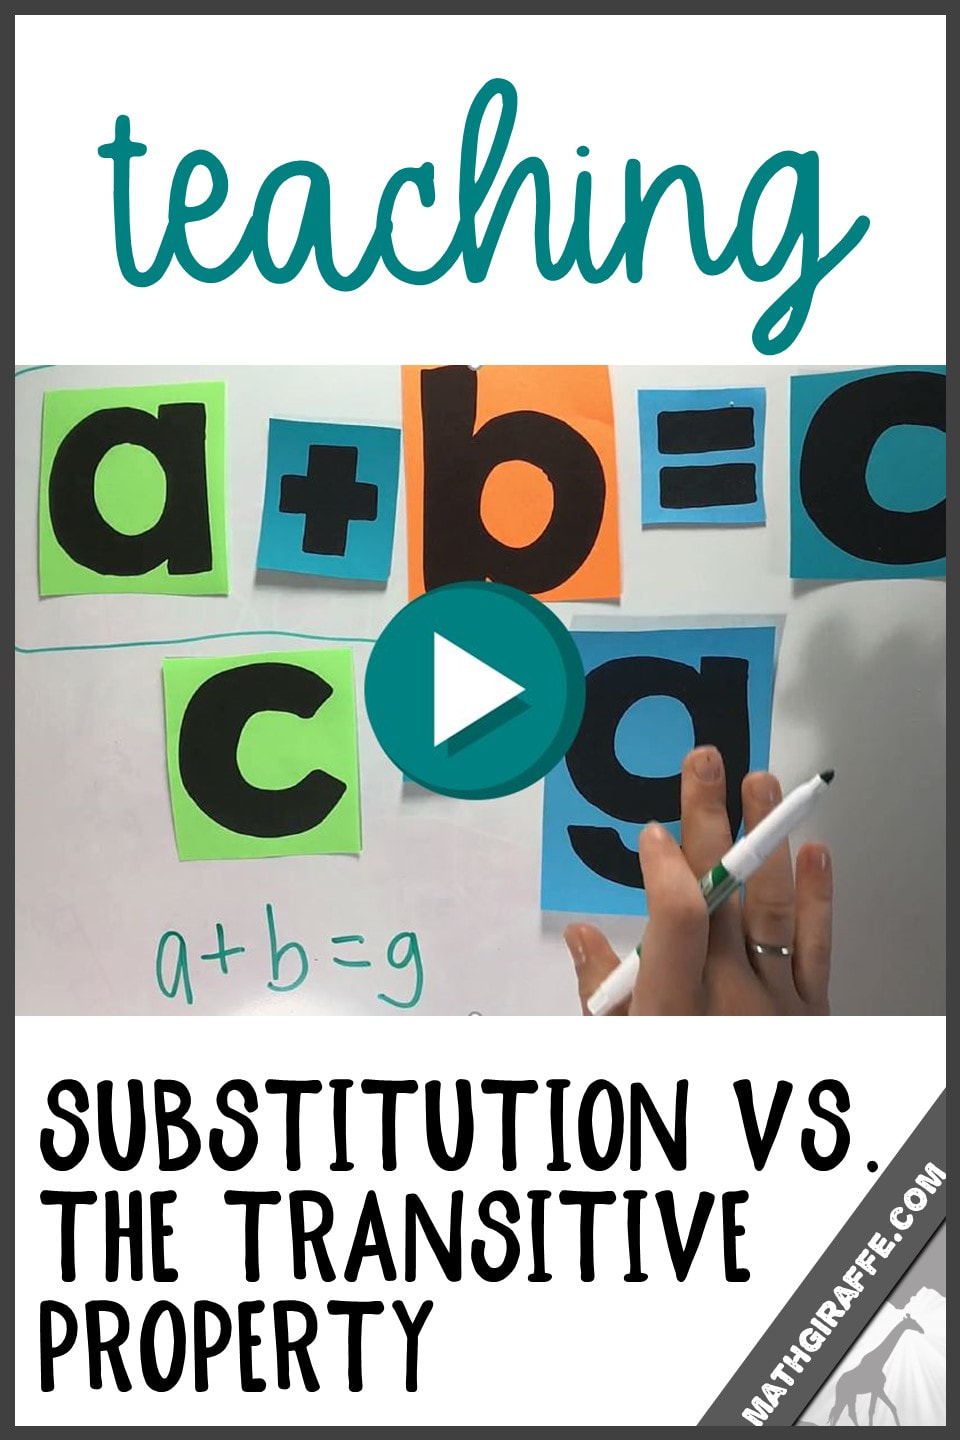
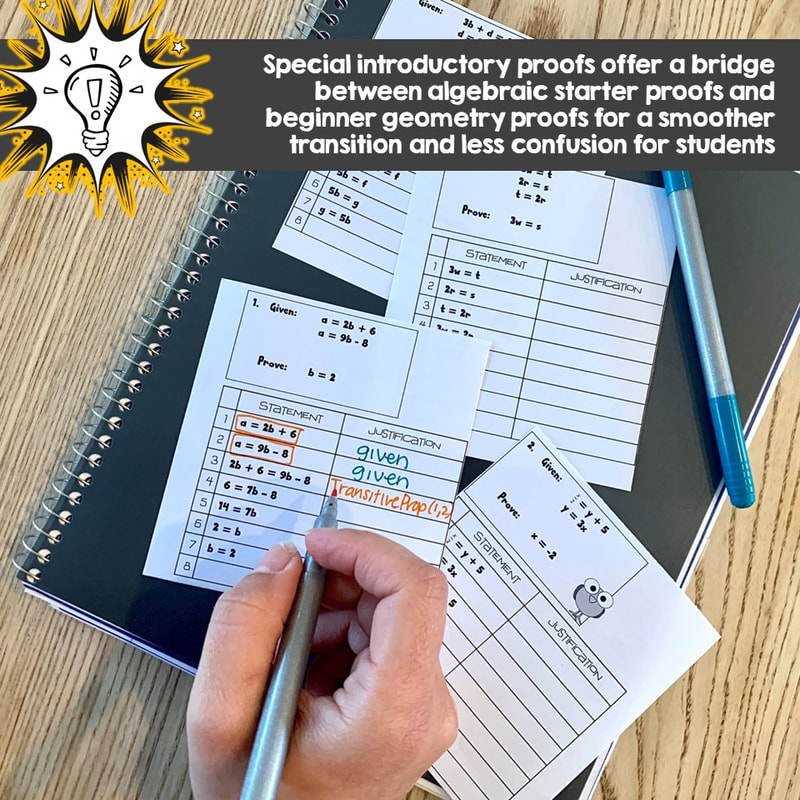
I started developing a different approach, and it has made a world of difference! The Old Sequence for Introducing Geometry Proofs: Usually, the textbook teaches the beginning definitions and postulates, but before starting geometry proofs, they do some basic algebra proofs. Most curriculum starts with algebra proofs so that students can just practice justifying each step. They have students prove the solution to the equation (like show that x = 3). That's fine. It's good to have kids get the idea of "proving" something by first explaining their steps when they solve a basic algebra equation that they already know how to do. But then, the books move on to the first geometry proofs. And I noticed that the real hangup for students comes up when suddenly they have to combine two previous lines in a proof (using substitution or the transitive property). They get completely stuck, because that is totally different from what they just had to do in the algebraic "solving an equation" type of proof. It does not seem like the same thing at all, and they get very overwhelmed really quickly. The standard algebraic proofs they had used from the book to lead into the concept of a two column proof just were not sufficient to prevent the overwhelm once the more difficult proofs showed up. Solving an equation by isolating the variable is not at all the same as the process they will be using to do a Geometry proof. A New In-Between Step: So, I added a new and different stage with a completely different type of algebra proof to fill in the gap that my students were really struggling with. First, just like before, we worked with the typical algebra proofs that are in the book (where students just justify their steps when working with an equation), but then after that, I added a new type of proof I made up myself. I led them into a set of algebraic proofs that require the transitive property and substitution. This way, they can get the hang of the part that really trips them up while it is the ONLY new step! We did these for a while until the kids were comfortable with using these properties to combine equations from two previous lines. My "in-between" proofs for transitioning include multiple given equations (like "Given that g = 2h, g + h = k, and k = m, Prove that m = 3h.") Instead of just solving an equation, they have a different goal that they have to prove. Their result, and the justifications that they have to use are a little more complex. This way, the students can get accustomed to using those tricky combinations of previous lines BEFORE any geometry diagrams are introduced. They are eased into the first Geometry proofs more smoothly. This extra step helped so much. After seeing the difference after I added these, I'll never start Segment and Angle Addition Postulates again until after we've practiced substitution and the transitive property with these special new algebra proofs. Here are some examples of what I am talking about. The books do not have these, so I had to write them up myself. (I am sharing some that you can download and print below too, so you can use them for your own students. There are also even more in my full proof unit.) 
Do you see how instead of just showing the steps of solving an equation, they have to figure out how to combine line 1 and line 2 to make a brand new line with the proof statement they create in line 3?
You can start with ones like this (above), where the statements are already provided and they just have to fill in the second column, and then as usual, after that you will want to lead into some where both columns are blank and they have to come up with the entire thing themselves. Here is a close-up look at another example of this new type of proof, that works as a bridge between the standard algebra proofs and the first geometry proofs. 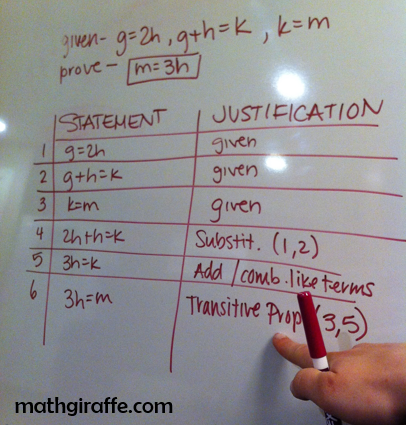
The way I designed the original given info and the equation that they have to get to as their final result requires students to use substitution and the transitive property to combine their previous statements in different ways.
Practicing proofs like this and getting the hang of it made the students so much more comfortable when we did get to the geometry proofs. It saved them from all the usual stress of feeling lost at the beginning of proof writing! Here is another example: 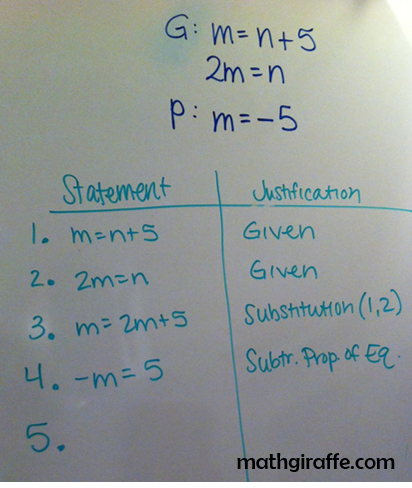
Sequencing the Proof Unit with this New Transitional Proof:
After finishing my logic unit (conditional statements, deductive reasoning, etc.), I start (as most courses do) with the properties of equality and congruence. I also make sure that everyone is confident with the definitions that we will be using (see the reference list in the download below). I introduce a few basic postulates that will be used as justifications. I spend time practicing with some fun worksheets for properties of equality and congruence and the basic postulates. Then, we start two-column proof writing. The usual Algebra proofs are fine as a beginning point, and then with my new type of algebra proofs, I have students justify basic Algebraic steps using Substitution and the Transitive Property to get the hang of it before ever introducing a diagram-based proof. The flowchart (below) that I use to sequence and organize my proof unit is part of the free PDF you can get below. The PDF also includes templates for writing proofs and a list of properties, postulates, etc. that I use as a starting point for the justifications students may use. The extra level of algebra proofs that incorporate substitutions and the transitive property are the key to this approach. 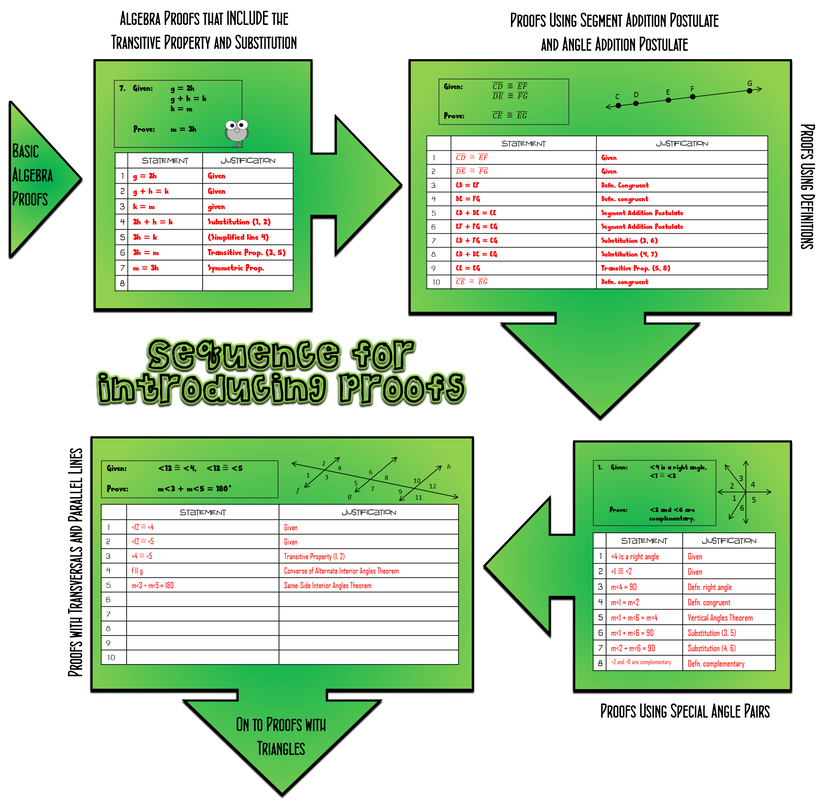
This addition made such a difference! By the time the Geometry proofs with diagrams were introduced, the class already knew how to set up a two-column proof, develop new equations from the given statements, and combine two previous equations into a new one.
Another Piece Not Emphasized in Textbooks:
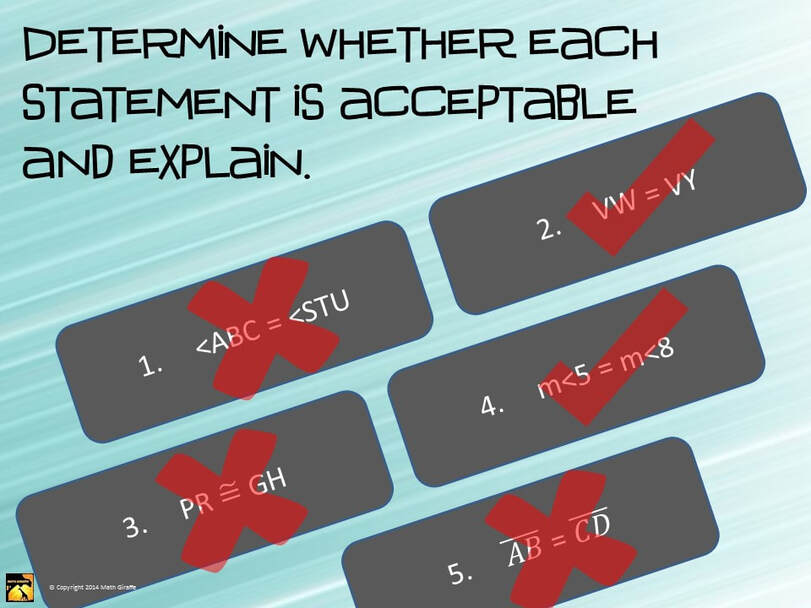
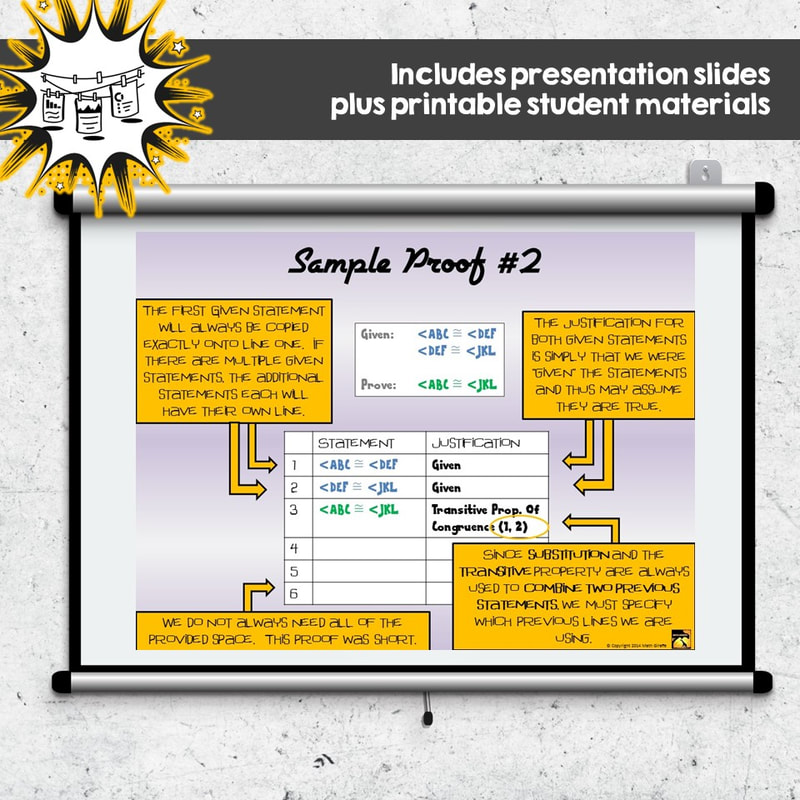
Here's the other piece the textbooks did not focus on very well - (This drives me nuts). Please make sure to emphasize this -- There is a difference between EQUAL and CONGRUENT. This is a mistake I come across all the time when grading proofs. It may be the #1 most common mistake that students make, and they make it in all different ways in their proof writing. I make sure to spend a lot of time emphasizing this before I let my students start writing their own proofs. I make a big fuss over it. I require that converting between the statements is an entire step in the proof, and subtract points if I see something like "<2 = <4" or "<1 + <2 = <3". 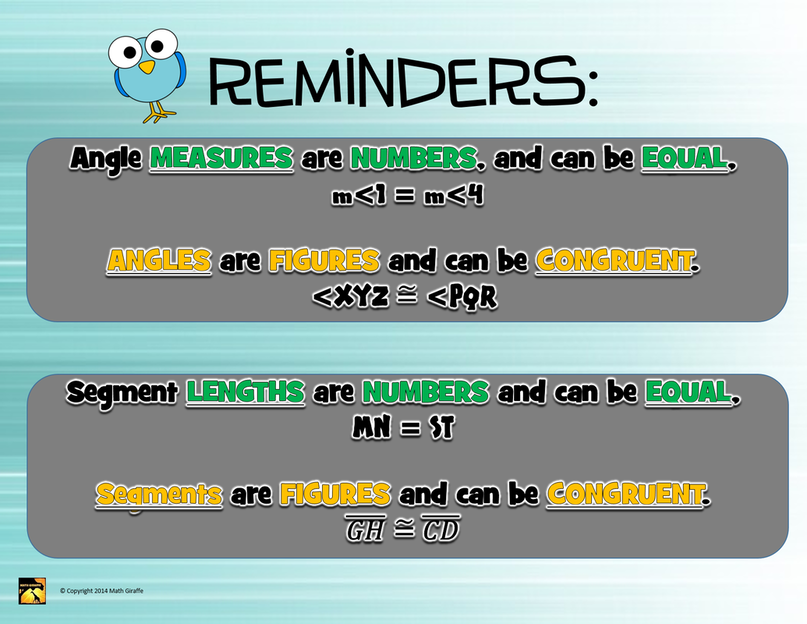
(The slides shown are from my full proof unit.)
When It's Finally Time for Geometry Diagrams:
In the sequence above, you'll see that I like to do segment and angle addition postulate as the first geometry-based two column proofs. Real-world examples help students to understand these concepts before they try writing proofs using the postulates. 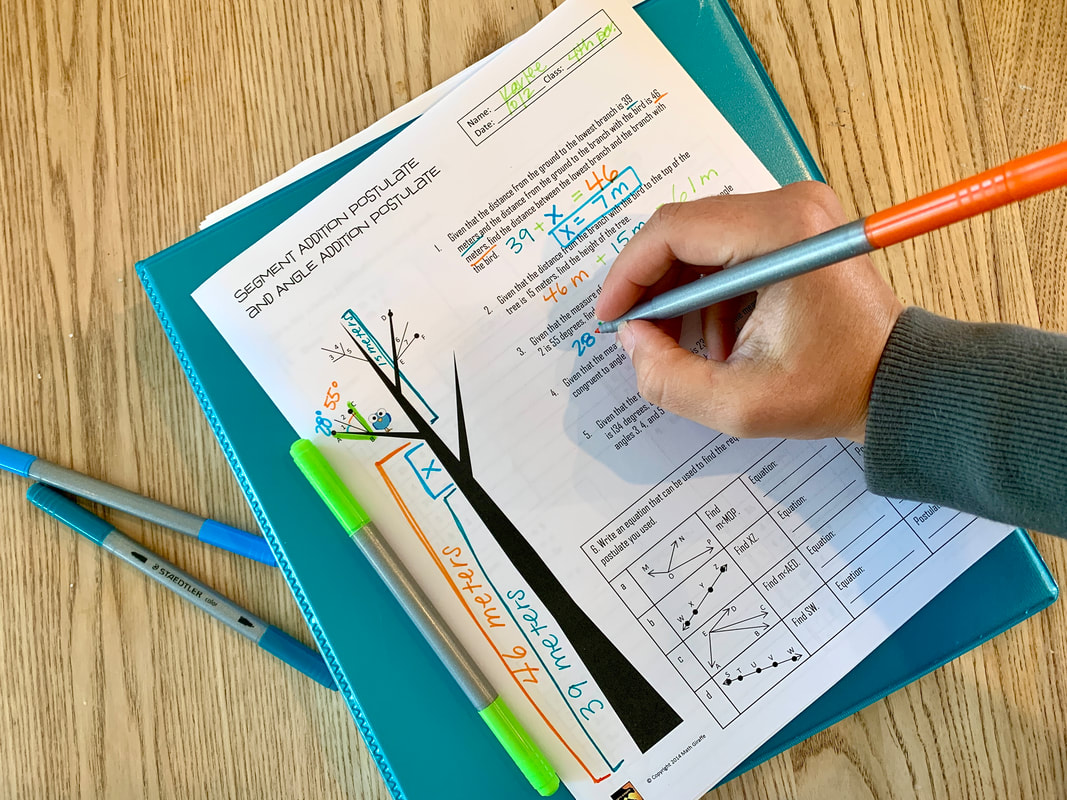
Guided Notes:
When you introduce the proof writing process itself, it's nice to have guided notes that students can keep as a reference. Interactive doodle notes are perfect for this because they blend words and imagery to help students retain the information and visualize it as a clear process in their minds.
The doodle notes I created for teaching Geometry Proof Writing are available here if you'd like to use these to accompany your proof lecture. This way, they can solidify the concept, build mental connections by blending visual and text info, and then have a reference that they can pull out when they are studying or when they are trying a practice proof and get stuck. 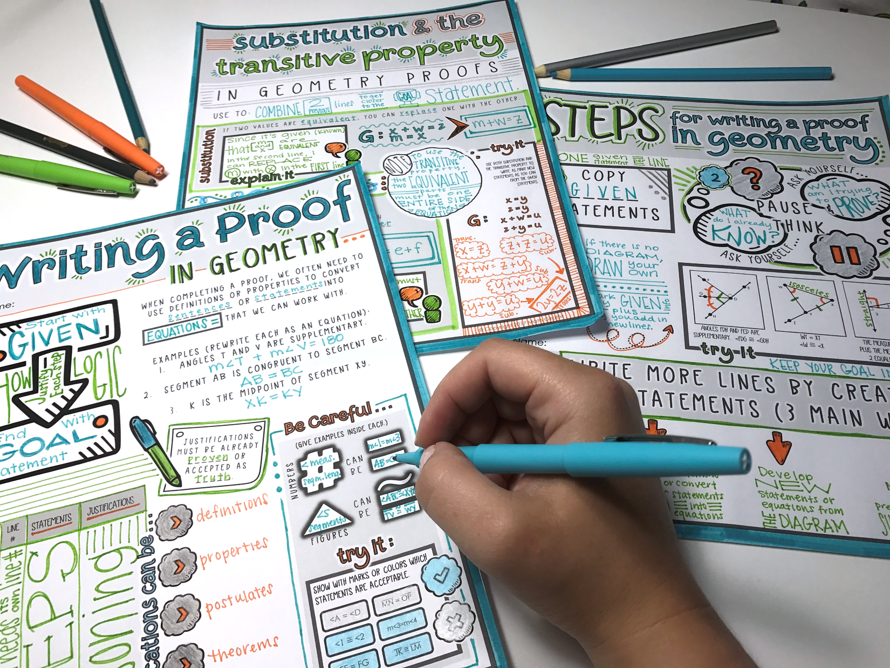
After practicing with those transitional proofs I added, my students finally did not have a problem easing into the next level of proofs with Angle Addition Postulate and Segment Addition Postulate. This made them ready for what used to be such a huge leap with other classes. We avoided all the struggle that usually comes with introducing proofs. They did not feel nearly as lost.
When we finally got into the good stuff, after watching me demonstrate a few proofs, a lot of kids would say things like... “Ok I kinda get what you are doing, and each step makes sense, but you are just making it look easy. It seems like you're just making it up." or "I understand some of where it is coming from, but there is just NO WAY I could come up with these steps myself and get from the beginning to the end on my own.”
Posters as a Guide for those "I'm Stuck" Moments:
To help them organize the procedure and get "un-stuck" when they were unsure how to progress to the next step, I developed a series of steps for them. Some kids really depended on this, and some thought that it didn’t help much. For students who do need that structure, though, this chart can be their friend on their desk at all times for the entire month as we progress through the unit. 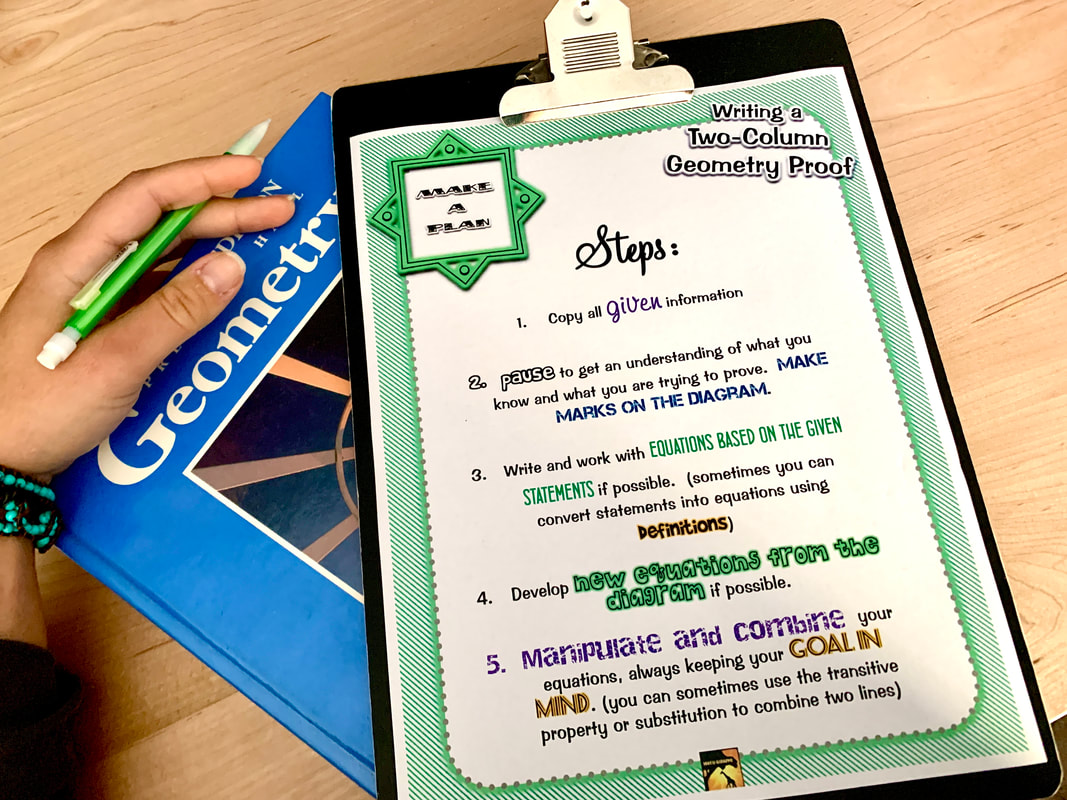
Another group of students seemed to need a reference list of what kinds of things can be used as justifications. Proofs are so different from anything that has been done before in their math classes. Each student seems to get stuck on a different part of the process. I found that having a reference sheet helped them a lot.
They can add to this sheet as they learn more postulates and theorems later on until they no longer need a list. 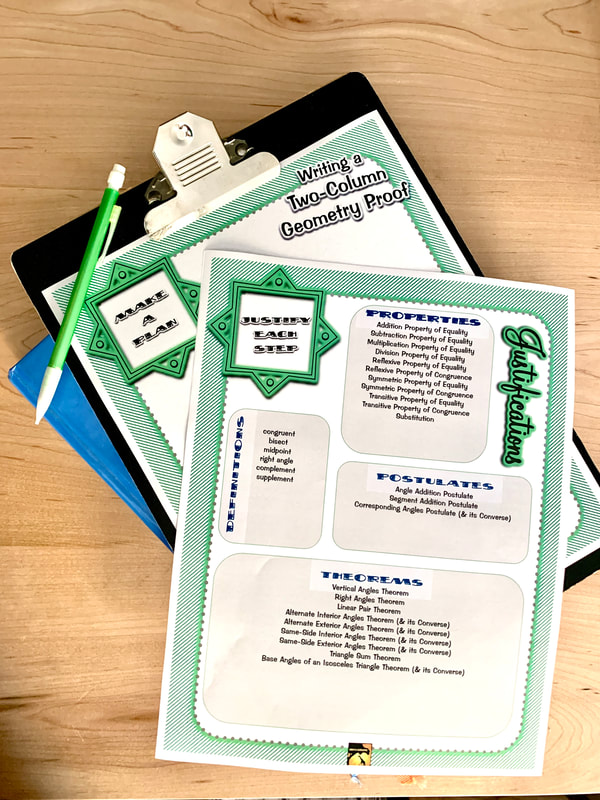
DOWNLOAD these POSTERS for FREE: Printable versions of these two pages are included in an email that I send out to subscribers. If you would like to have the 8.5x11 posters for your students, subscribe to the Math Giraffe email list, and they will be sent straight to your inbox as part of the toolkit for teaching math!
Enter your email address here to get the pieces shown above sent to your inbox:
(An additional free download is available below, so scroll down for the printable download of the special algebra proof samples too!)

Next, we move on to proofs with special angle pairs (supplementary angles, vertical angles, etc.) From there, things tend to smooth out. It gets easier to introduce each new type of proof, because all that is changing is the theorems that we use as we lead into proofs with triangles.
The format of stepping through a puzzle and getting to the end of the proof stays the same. It's best to keep the structure well-organized and the same throughout. I keep a template handy with my 2 columns in the same format, so I can just fill in the blank space at the top and copy it for any new type of proof. The students can feel the familiarity of the columns and structure all throughout the course. 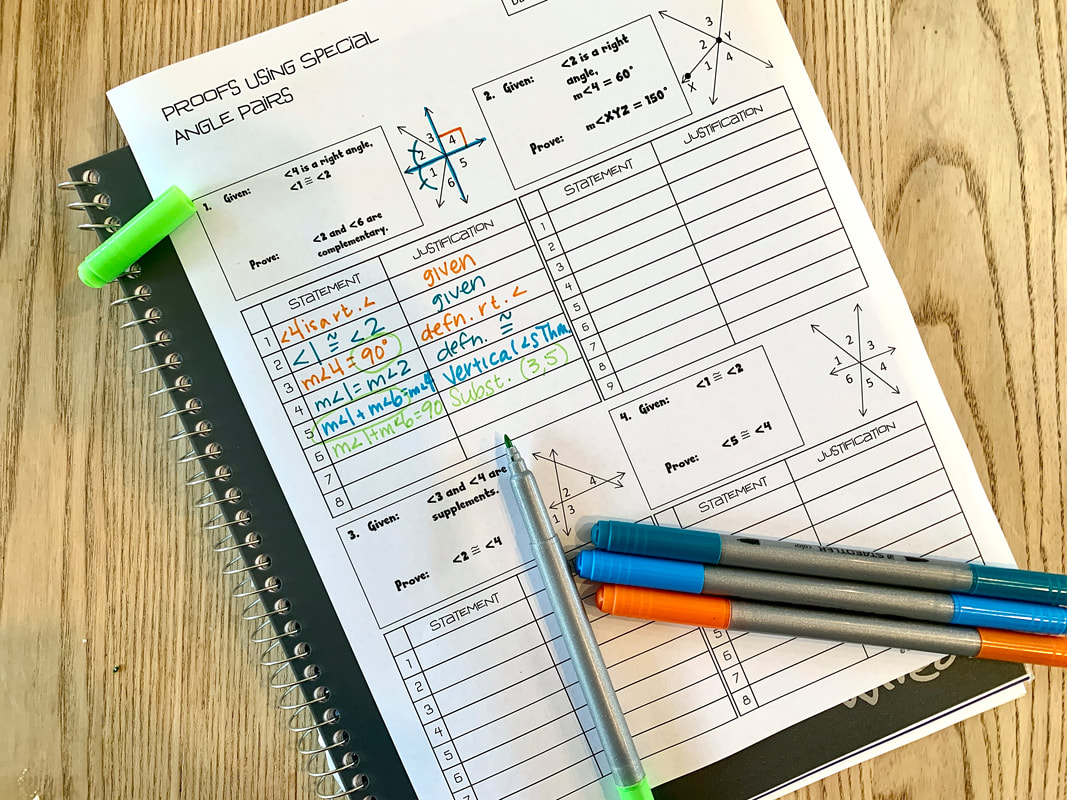
Try it - Free Download
You can use this sample set to try these algebra proofs in your own classroom. You'll love the way this additional lesson leads your students into proof writing more smoothly. This PDF includes a few examples that are half-sheet size. They work really well as warm-ups. 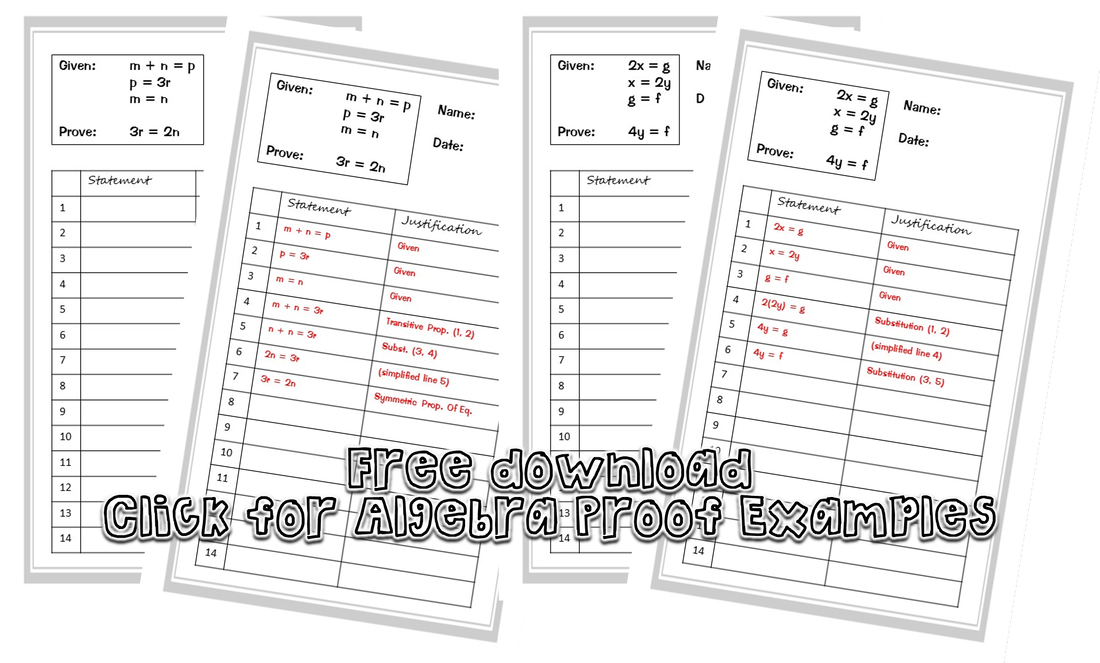
If you like this format and would like my full Proof Unit, it's available here:
FULL Geometry Proof Unit: Presentation & Printables 
Click the images for more information.
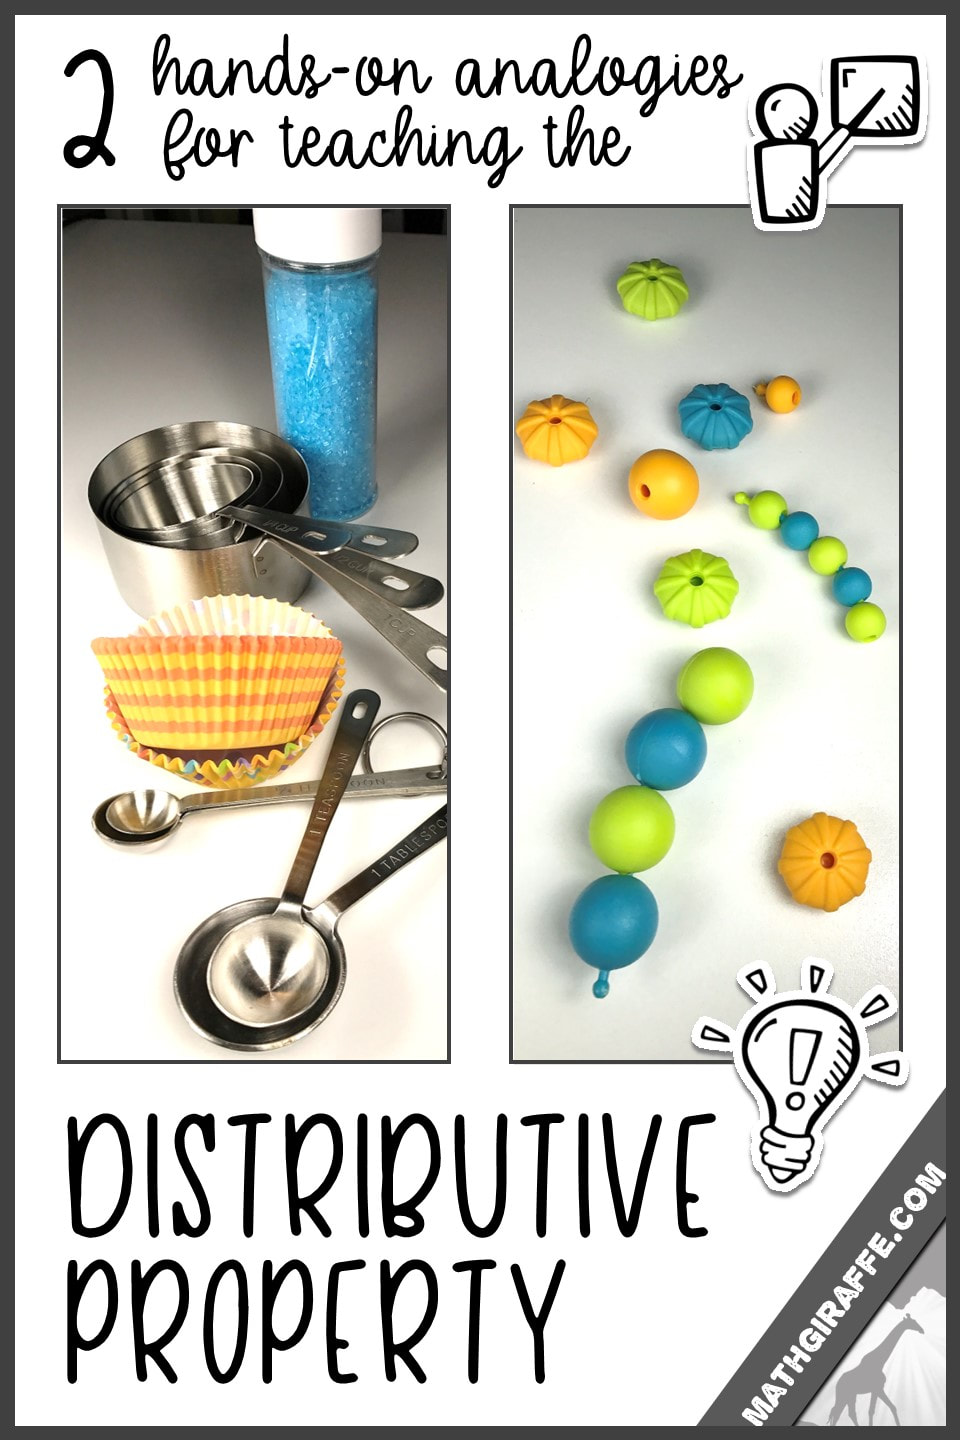
Algebra Tiles to Print on Label Paper for Interactive Notebooks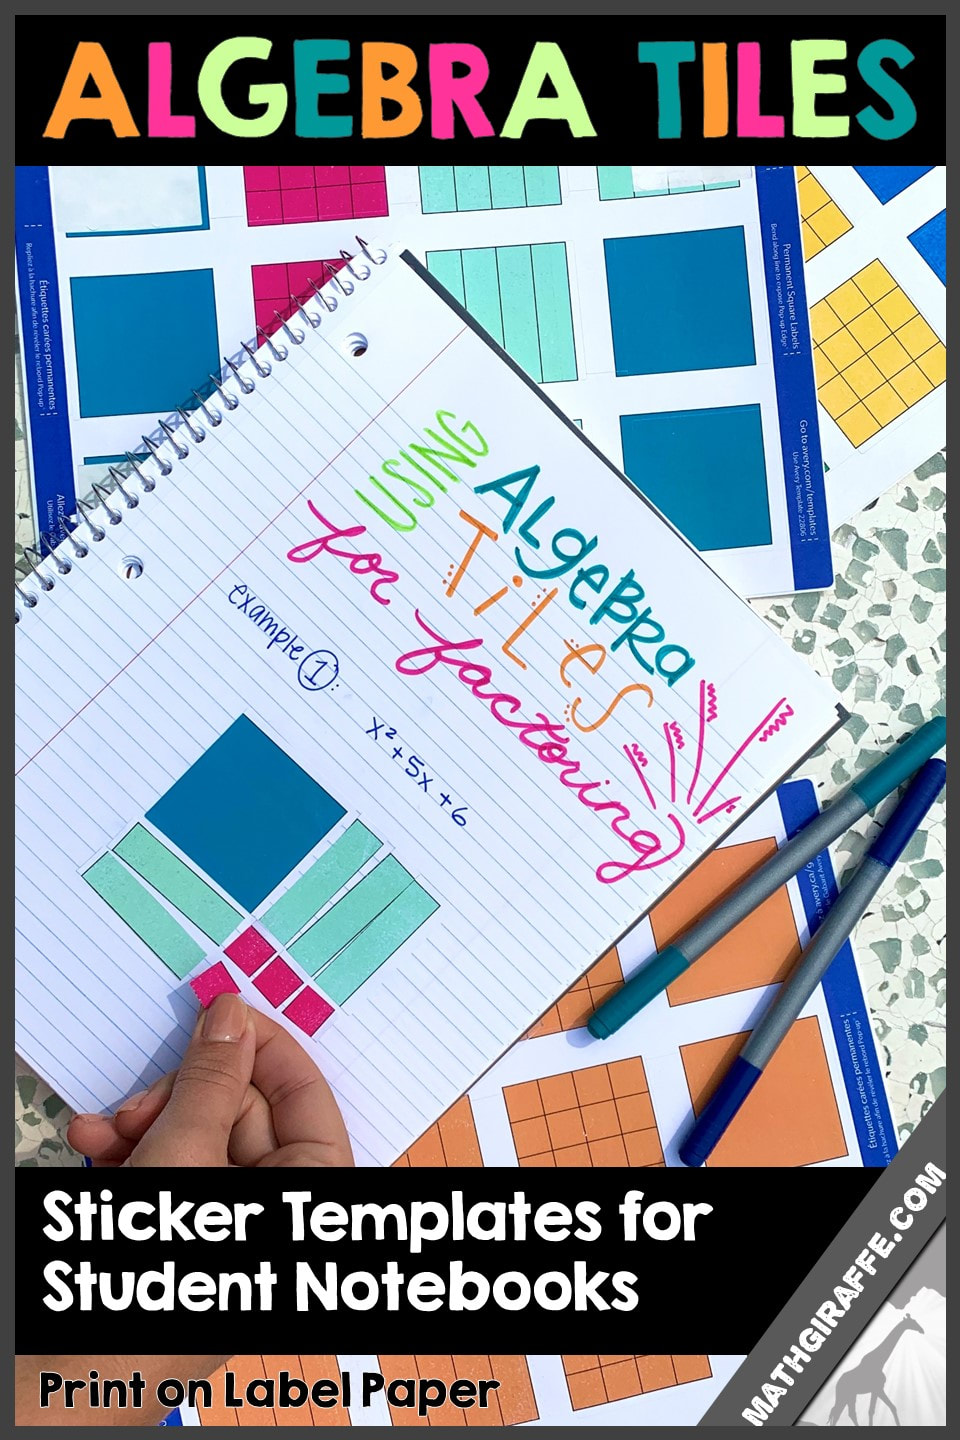 If you are planning to use Algebra Tiles for factoring and want students to get familiar with them, you will likely have a set on hand for them to use as a manipulative. They'll practice using them in class as you model it. But the challenge is that they don't have a permanent representation of what they arrange on their desktop. They'll lay out the algebra tiles on the table, start to understand the concept, and learn how to factor using algebra tiles. But they won't have anything to take away as a model to review from. It can be nice to have another version that they keep in their notebooks. Just a few examples will do. This way, they can have a copy to take home. These sticker templates are an easy way for kids to have a representation of the algebra tiles in their own notebooks. 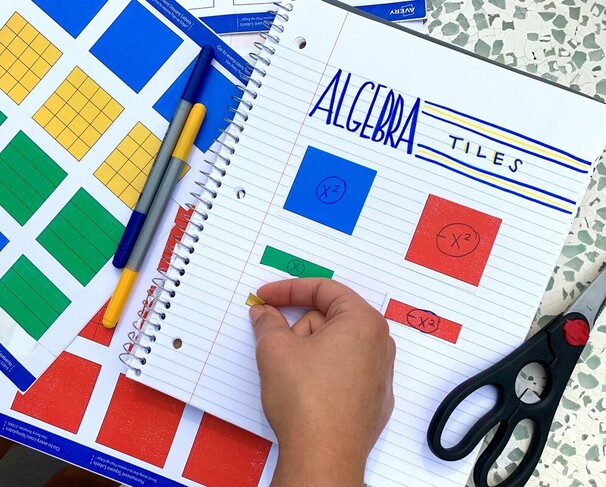 To use the templates, just pick a color (I've included standard coloring that matches the algebra tiles you probably have in your classroom, as well as another fun color option), then print a page for each student. They'll quickly cut down the lines for the smaller ones, and then they can peel and stick them right into their notebooks as you do notes and examples. I'd recommend only printing one or two sets of stickers per student. That way you don't need to get too many sheets of label paper. This way, you can do a couple of examples with the real algebra tiles, then do one or two different example problems that they can model in their notes with these stickers. Of course, they can also then just draw the tiles themselves later on if they want to keep modeling problems this way on worksheets or homework. They will not need to use stickers every single time. It just offers a nice in-between option for them where the hands-on effect of a manipulative and the permanent drawing version to keep in a notebook can meet halfway. If you use these too long, it will likely become too cumbersome and not be worth it anymore. Try just using a sheet of these when you introduce each new way to model with algebra tiles. 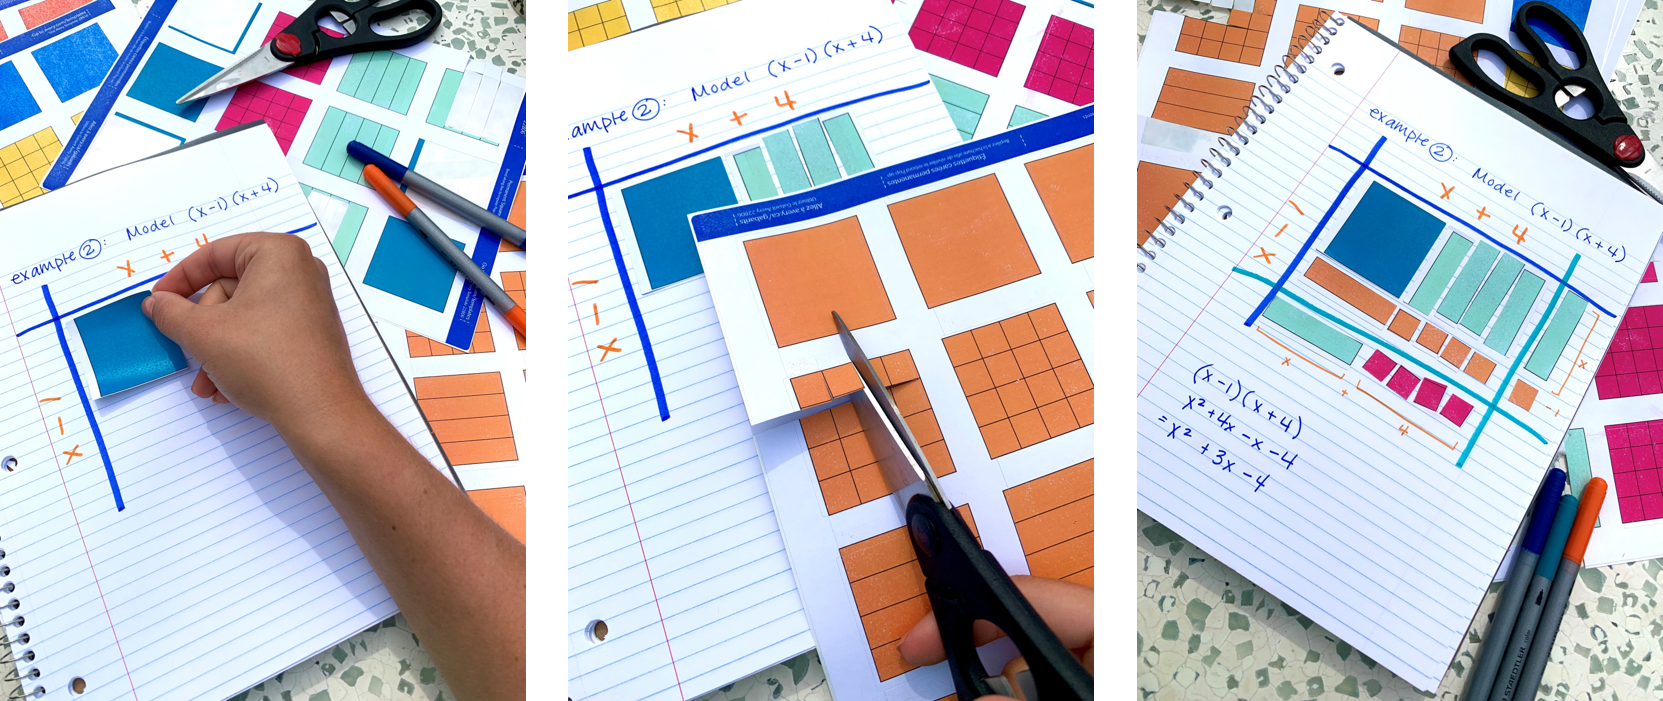 The template (free download below) has a link to the right size & shape of label paper as well so you can get the correct one to fit these templates. This limits the cutting. However, if you have plain full-page sticker paper available that you use for my other templates, you can just use that too. The students would just have to do a bit more cutting, since the squares won't be pre-cut for them. The Avery label paper I've linked to just makes it easier. 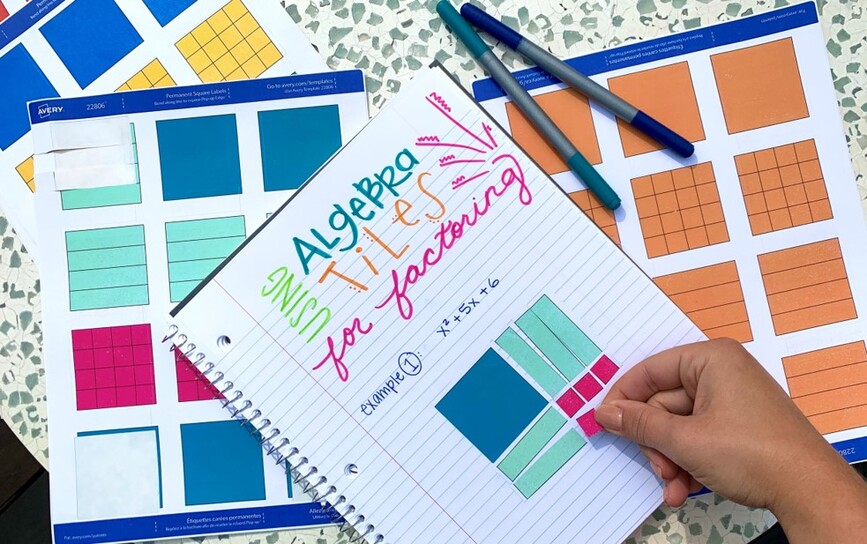 Try these other creative math teacher hacks too:
|
Archives
December 2023
Click to set custom HTML
|

 RSS Feed