
|
2/2/2016 1 Comment Segment Addition Postulate
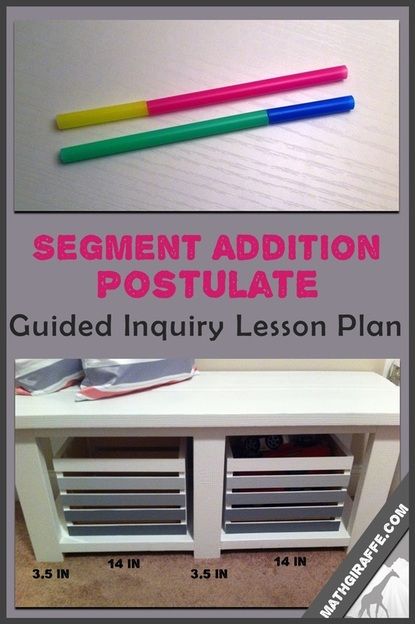
I prepped this by cutting a bunch of straws all in the same place. That way, I could just swap out colored sets so that each table had this:
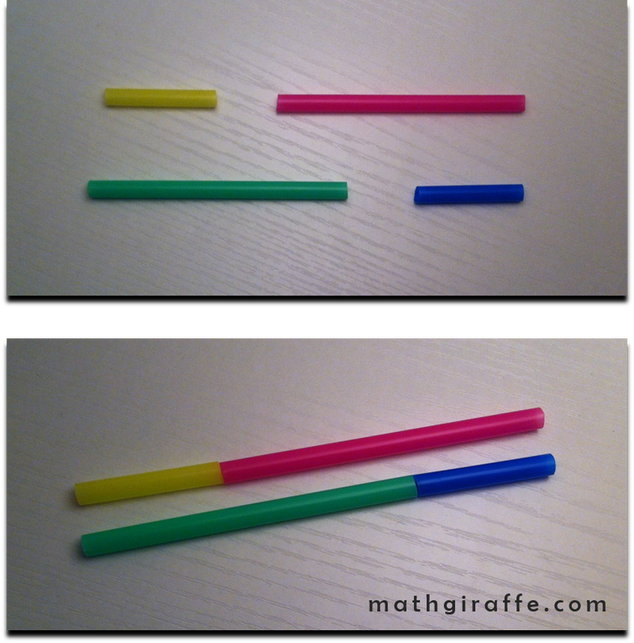

For something this quick, I like to keep it as a full-class guided inquiry. Just say "Without measuring, I can tell you you may assume that both of these new "straws" are the same length. Now what if I told you that the yellow and blue pieces are also the same length? What could you conclude about the green and pink pieces. Why?"
Give some time. Allow them to discuss with a partner. Yes, it's obvious, but require each pair to come up with a very clear explanation of WHY. Then, have them write it out (just in a notebook or on scrap paper for something like this). It only takes a minute, and does not require a formal worksheet. When students think they have a great explanation, allow them to share it out loud with the class. This is a great opportunity to zero in on properties and vocabulary. I'm a big stickler on this. It is so crucial that students do not write that the pink piece is "equal to" the green one. I also do not allow explanations that say "the yellow piece plus the pink piece." Students must say that "the length of the yellow piece plus the length of the pink..." I always feel like I cannot possibly over-reinforce the fact that measurements can be equal, whereas segments are congruent. Otherwise, when we lead into proof writing, I see angles being added instead of angle MEASURES being added. I like to show this slide to clarify that over and over! (Check out proof writing in more detail here.) 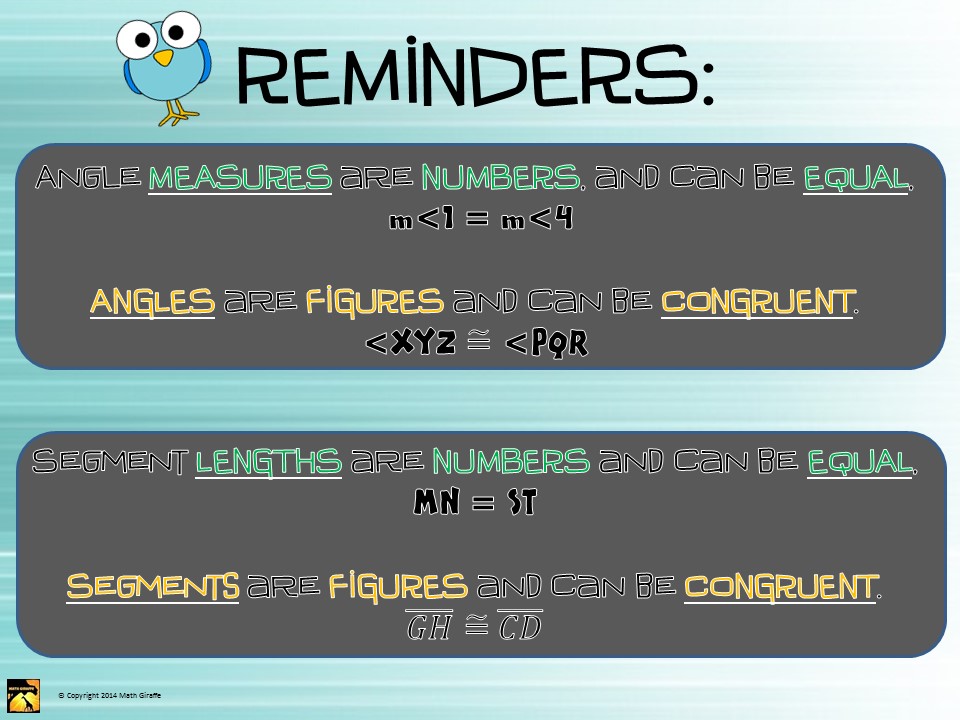
Once they really tweak and perfect the explanations, develop an official postulate together and clarify that now they can use this new "Segment Addition Postulate" to justify steps.
The key to the guided inquiry process is that the students have noticed the properties that are at play here, and they explore it enough to write their own postulate. It's hard to hold back, but don't be tempted to feed the postulate to them. They'll get there eventually as you slowly help them revise their "explanations." Next phase: Tell a story! I like to tell the students stories about real-life projects, so for this one I chose to use a bench that my husband and I just built. Feel free to steal my story (I stretched the facts to make the math situation work anyway, but I willingly admit it). And project or display my bench pictures as your sample if you want! "We were assembling this lovely bench at my parents' house, 3 hours away, because that's where all the good tools were. So it was sitting there on the garage floor covered in wet paint until our next road trip to go pick it up. I wanted to put it in my daughter's room when we brought it back home. I was getting all the furniture moved around in her room, and making space for it. I was wondering if I could fit it under the window, when suddenly I realized I had forgotten to measure it! We did not follow any particular plan to know the exact dimensions! However, I had taken a photo of our hard work, and I knew that we had used 2x4s for the legs. (Explain that 2x4s are actually only 3.5 inches wide.) I remembered cutting the bottom front faces to 14 inches each. Can I figure out how long the whole bench is?" 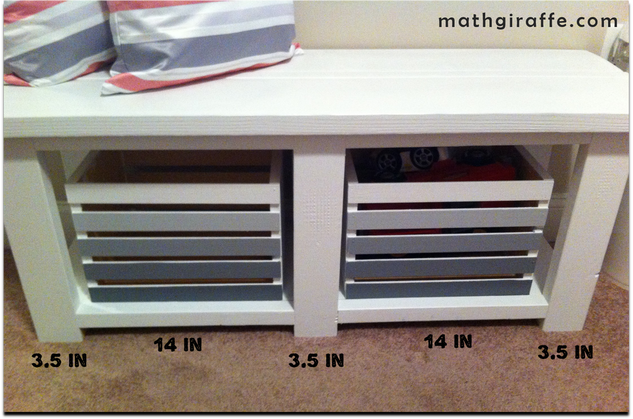
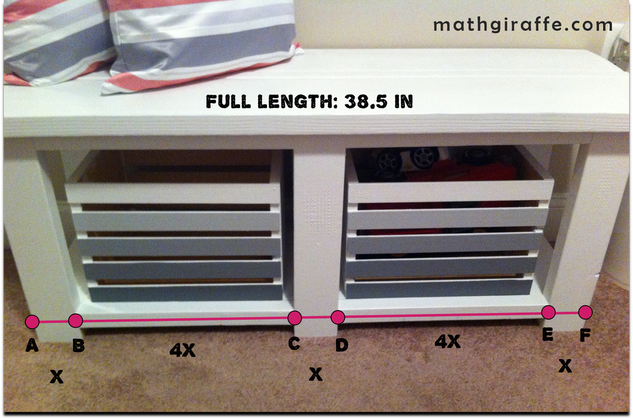
Of course, they will be able to handle this math. They could have answered the problem in 4th grade. Make sure to then lead into variables and replace each 3.5 with an x, and each 14 with a y. Then show the next picture, and ask them to write an equation that's more complicated. Try taking out different missing pieces of information. Ask them if they knew the full length, how could they find one piece? This will lead into sample problems. Have students set up an equation for only AD, then for AE, etc.
Wrap it up by going back to the straws. Now, give them measurements for each segment (as expressions with variables!) and ask them to write an expression representing the length of all 4 of the pieces lined up as one long segment.
Check out these related posts: 

1 Comment
|
Archives
December 2023
Click to set custom HTML
|
 RSS Feed